See update below if your Pi4 GPIO buttons don’t work or only some of them work, you might need to do an extra step to get them working.
These instructions were written when all I had was a pi 3. They should work on a Raspberry Pi 4 since it’s GPIO is mostly the same. I’m not sure I would bother on a Pi 5 since they changed quite a bit on the GPIO, plus at the time of this writing, Fruitbox crashes on a Pi 5 when trying to use the button config tool. Also, Pi5s have a dedicated power button so these instructions don’t really apply there.
I’ve been asked these questions several times. What buttons did you use, and what encoder did you use? This is how I wired up my raspberry pi buttons for Fruitbox directly to the GPIO header on my Raspberry Pi 3. This eliminates the need for a separate keyboard encoder (if you’re using 26 or less buttons). There is always more than one way to skin a cat, this is how I skinned mine.
To power off your Pi from within Fruitbox, you can use the SysRq key Which on my keyboard is also the PrintScreen key. You can change this key in the menu to any key you want (make sure it’s not already assigned to something else). To start your pi, you’ll need to short pins 5 and 6 on the GPIO. It’s easy to wire a momentary switch to those pins. Since Fruitbox can access the GPIO, you can now go back into the menu, configure buttons and go to the power off entry and press enter to change it. Press your power button. If you wired it properly, it should change from SysRq to GPIO-3. Now you can power the Pi off and on with that switch.
In order to power off the pi outside of Fruitbox, you’ll need to edit a file.
From the command line: sudo nano /boot/config.txt
At the very bottom of the file type – dtoverlay=gpio-shutdown
ctrl-x to exit nano. Y and enter to save.
For the change to work, you’ll need to reboot. Now you should be able to use the power button (short pins 5 and 6 on the GPIO) from the raspberry pi OS desktop.
This is what I’m using for a power button. https://www.amazon.com/gp/product/B0752RMB7Q
Next, you’ll need to get some buttons for the control panel. These are the ones I used, but any momentary switch buttons should work. Typically you’ll want buttons with NO (normally open) switches like in arcade control panels. The buttons linked here will work in (NO) Normally Open or (NC) Normally Closed orientation. The current version of Fruitbox needs these to be wired to the (NO) Normally Open pins, but I believe Fruitbox version 2 will allow either Normally Closed or Normally Open. I’ll include a photo below of the pins on the buttons. Please note that for these buttons, your control panel will need to be relatively thin enough for them to be tightened down. If the control panel is too thick, the button will not have enough threads for the nut to screw on the back and tighten properly. If that happens you’ll either need to possibly glue the buttons in or use something else entirely. In my situation, the buttons fit the control panel nicely, but if I had to do it, hot glue would have worked well to hold the buttons down in this scenario.
12 volt LED buttons – https://www.amazon.com/gp/product/B01MRWL6JS
The buttons I linked to above are 12 volt and have LEDs that can be lit if you wish. They sell a nearly identical button that is 5 volt and a little cheaper.
5 volt LED buttons – https://www.amazon.com/MonkeyJack-10Pack-Square-Momentary-Button/dp/B0745GQ39T
If you want labels on your buttons, you can print on transparency paper like this overhead projector paper and cut your decals out of that. The caps on the buttons can be easily pried off and you can put the labels under the lens cap of each button. When I did mine, I touched each decal onto a glue-stick to make it stick slightly to the button lens cap to prevent it from moving around when I put the cap back on the button. The glue is not noticeable at all when you look at the buttons.
Transparency paper – https://www.amazon.com/gp/product/B07KS3VTQQ
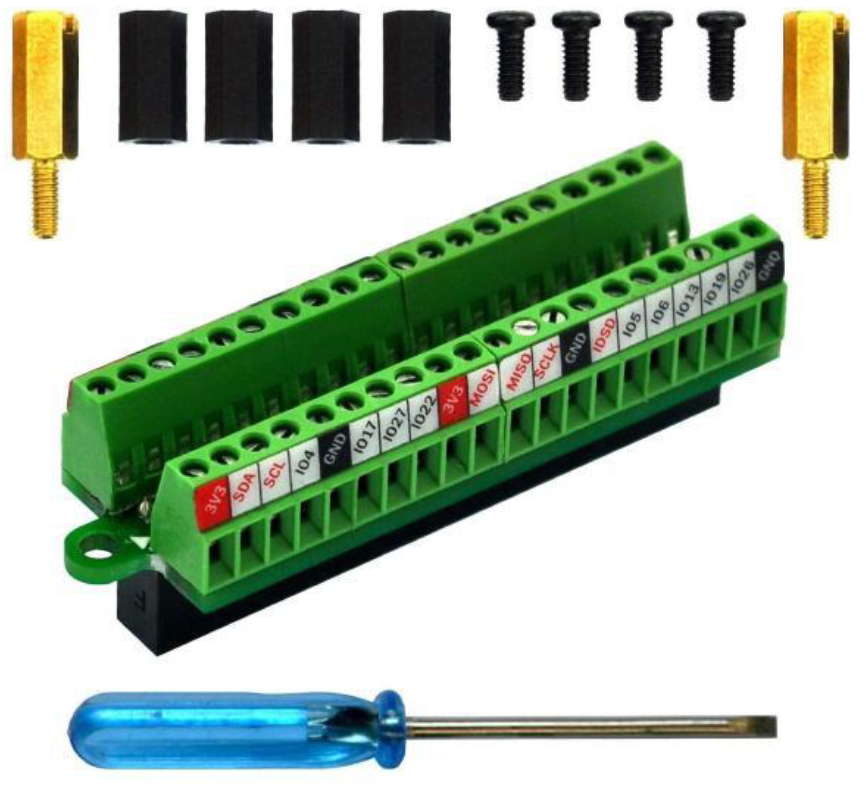
There are a few ways you could wire your buttons to the GPIO. Originally I was going to crimp my own Dupont connectors with a set of Dupont crimping pliers, but that seemed like too much work. If you don’t have the connectors or a set of crimpers, Dupont connectors are not really an ideal way to go anyways. The easier way is to purchase this GPIO terminal block breakout board and plug it in to the GPIO header. The terminal block allows you to simply strip back your wire a bit, stick it into the hole corresponding to the pin on the GPIO and screw it down. The terminal block will overhang the edge of your pi a bit, so if your pi is in a case, you might need to cut the case away a little to get the terminal block to fit. The terminal block also comes with screws and standoffs so you can screw it down to your pi, but there is a pretty good friction fit when you plug in the terminal block in so I skipped screwing it down.
GPIO Terminal Block – https://www.amazon.com/gp/product/B084C69VSQ
For the wiring harnesses, I used ethernet cable. It’s cheap, abundant and I had plenty available to me. Not the prettiest, but it works great. I used 3 ethernet cables giving me 24 buttons and I had a separate set of wires for the power button. (I’ve since added a 26th button for an enter key that I’ve hidden in the back of the jukebox that I use for for selecting skins.) One end of the ethernet wires gets stripped back to be screwed down to the terminal block. The other ends of the wires get a female spade connector crimped on. The spade connectors make it easy to connect to the buttons once they are installed in the jukebox cabinet. These all get wired to the (NO) Normally Open pin on the buttons. For the Ground side of the buttons, these can all share a common ground wire. For my purposes I used a ground wire that had female spade connectors all daisy chained to the same wire. Luckily for me I had these already laying around from a previous project.
Female Spade Connectors – https://www.amazon.com/gp/product/B01962MW2G
For Fruitbox V1: Once your all done wiring everything up, you’ll need to set up Fruitbox to recognize the new buttons. Run Fruitbox with the –config-buttons command. When Fruitbox opens, you’ll be given the opportunity to press each button to correspond to the action presented to you. Have your keyboard plugged in at the same time so you can press escape on the button actions you won’t be using.
For Fruitbox V2: In V2, when Fruitbox is running, open the menu within Fruitbox by pressing the tab key on your keyboard. Use the left and right keyboard keys to navigate the menu. Go into the Controls menu by pressing the enter key and then into Configure Buttons menu with the enter key. Select the key to edit. Press enter and then the GPIO connected button you’d like for that function. Repeat until finished. Restart Fruitbox for the new keys to take effect. Keep in mind that when you change the left, right and enter keys from keyboard to GPIO, those keyboard keys will no longer work for navigating the menu. You have to use the GPIO enabled keys. If you screw your keys up, you can always edit the Fruitbox.ini file or completely delete it and let fruitbox rebuild it. Caution with deleting it as any music paths you previously set up will also be erased.
One thing to note. If you plan on installing a DAC hat, this mod ‘might’ make that impossible. Personally, in my opinion, if you have good powered speakers, you don’t need a DAC hat. If you insist on having one, foregoing the GPIO and using a usb keyboard encoder might be the way to go. I recommend Groovy Game Gear’s encoders as well as the Ultimarc encoders, but you can probably get away with the cheap Chinese encoders found on Amazon.
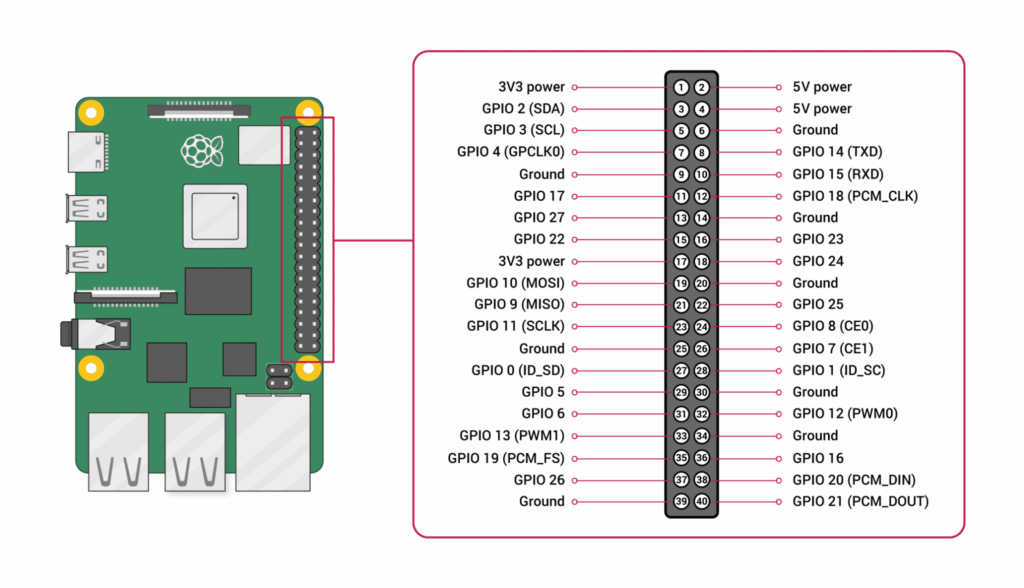
Recommended reading – GPIO and the 40 pin header. (Scroll about 3/4 of the way down the page.) https://www.raspberrypi.com/documentation/computers/os.html
Update for Pi4 users:
You have your Pi4 buttons wired up to the GPIO and you are unable to assign button presses, or the buttons you’ve manually assigned in the fruitbox.ini file don’t register. You’ve gone over your wiring and everything looks good but only a few buttons like the left and right button register. You’re not crazy. Fruitbox is supposed to configure the buttons as input with an internal pullup resistor. For some reason this doesn’t seem to work on some (all?) Pi4s. For me, the only buttons that registered were the left-right buttons. In order to remedy this, you’ll need to edit the config.txt file. This is the file the OS uses at boot up. You can edit config.txt directly from your Raspberry Pi OS installation. You can also remove the storage device (micro sd card) and edit files in the boot partition, including config.txt, from a separate computer. On Bookworm, the file is found in the /boot/firmware/ folder. On Bullseye, it should be found in the /boot/ folder. Once you locate and open the file in a text editor, scroll to the bottom and add the following line.
gpio=0-27=ip,pu
This means, at boot up, GPIO 0 – 27 will be set to input with pull up.
If you need some of the GPIO inputs to be reserved for a DAC hat or any other hat, you can skip those inputs in your GPIO statement. You can include separate lines as well.
gpio=4-17=ip,pugpio=22-27=ip,pu
The statements above skip GPIO #s 0-3 (effectively pins 3 and 5), and GPIO 18-21 (pins 12, 35, 38 and 40). This configuration is useful for when the the Hifiberry + DAC is used.
Save and close the file and reboot your pi. Load Fruitbox and try again.
More reading about editing the config.txt GPIO stuff can be found here. https://www.raspberrypi.com/documentation/computers/config_txt.html#gpio-control