
Touchscreens can sometimes be a touchy subject (see what I did there – dad humor) in regards to getting them to work not only in Fruitbox, but on the Pi as well. I am going to tell you about the problems I had with one I purchased, and how I got it to work. This may help you to get yours to work, but there are many stories of people not being able to get their screens to work at all in Fruitbox, so take this anecdote with a grain of salt.
The touchscreen I purchased is an Eyoyo 13.3 inch touchscreen model EM13L. This touchscreen has the inputs on the side and is marketed as a portable monitor. It takes an HDMI connection and has 2 USB C inputs. One of the inputs is marked as a power input and it comes with a 5 volt wall wart style ac adapter USB plug like you’d use to charge a cell phone. The other USB C port is for the touch function and plugs into your laptop, phone, Raspberry Pi, etc. I’m not sure exactly how the power on this unit works. It powers on with only the 5 volt USB C power plugged in, but the screen gets noticeably brighter when you plug in the second USB C plug, so it is obviously getting power from both. Knowing the USB output is typically 5 volts, I tried plugging both USBs into the Raspberry Pi to see what would happen. It was not good. The monitor came on but immediately turned off and continued flashing on and off. Not really sure what was going on, I decided to run the power separate from the Pi and use the AC plug that was included with the monitor. Everything seemed to work fine when I ran the power from the ac adapter wall plug, and the touch function seemed to work fine in the OS.

I built a jukebox with a 5 volt power supply that powers the Pi via a USB C cable hardwired to the power supply. My intention was to run power to the Pi and the monitor both from this same power supply. When I got the whole jukebox built and everything wired, the touch function on the monitor didn’t seem to work. I could unplug and re-plug the touch USB cable from the Pi and then the touch would start working, but this was not an ideal way to get the touchscreen to work if I had to do that every time I rebooted it. After thinking about it overnight, I decided to unplug the USB C power I hardwired to the 5 volt PS and plug in the power to the monitor with it’s wall wart ac adapter. In my test, I powered the Pi on at the same time as plugging in the monitor. Surprise! The touch worked. For some reason, sharing the 5 volt power supply would make it so the Pi would not see the touch function on boot. Testing over and over, the touch function worked when I tried powering on both the Pi and touchscreen at the same time. The 5 volt power supply only has a single output so the Pi and monitor were sharing that single output. Upon reflection, maybe something about this setup was causing the touch to not function on boot. I don’t know why. I would like to try a power supply that has more than one output and see if it makes a difference. In a rush to get my project finished, I decided to just use the original wall wart ac adapter and plug in the monitor that way since it seems to work, even though it made the wiring a little interesting. So now when the switch is thrown, the 5 volt power supply comes on for the Pi and the wall wart 5 volt ac adapter comes on for the touchscreen and everyone is happy – except for Fruitbox.
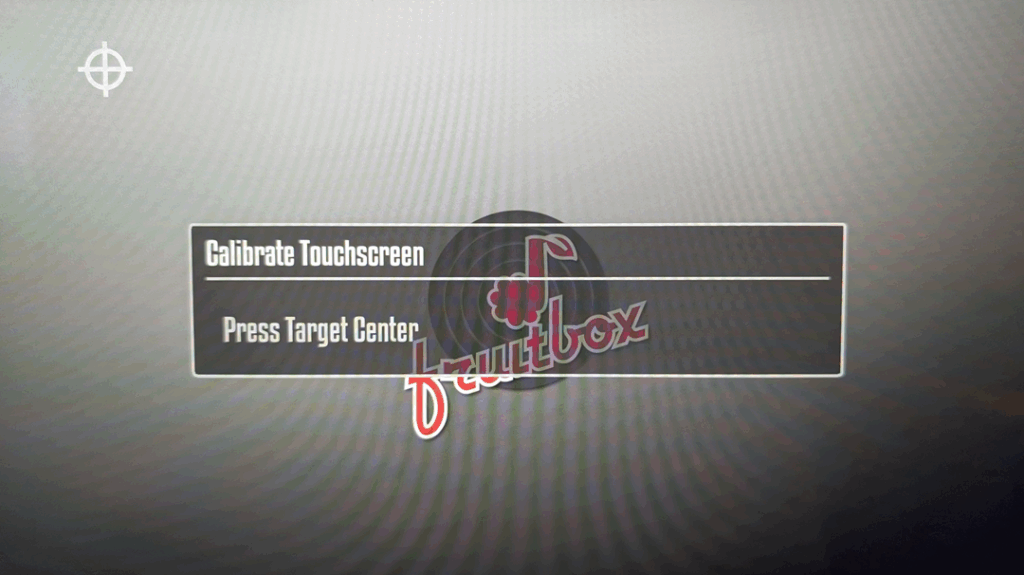
In Fruitbox, I turned on the touchscreen function by pressing Tab, and going into the control settings and turning it on in there. You will need to exit Fruitbox and start it again for the settings to be applied. Note: If the touch option in the control settings is greyed out and you can’t select it, it means that Fruibox and probably the Pi itself can’t detect or use the touch function. Get it working outside of Fruitbox before going any further with trying to get Fruitbox to use it. When I started Fruitbox again, the calibration routine ran. Touch a dot in this corner then touch a dot in the other corner. Exit Fruitbox and restart again. Now all calibrated, everything should be great, but it wasn’t. The touch didn’t work. I mean I tried touching all over the screen. I noticed that occasionally touching the screen in one spot would press a button in some other part of the screen. So it seemed the touch works but there is a coordinates issue.
Installing and running evtest
I read somewhere that someone was able to get their touchscreen to work in Fruitbox by using evtest. The goal of us using evtest is to find the correct coordinates for Fruitbox to use. A little research and a few minutes later, I had evtest installed by using the following command in a terminal. Note: You’ll need to be conected to the internet to install it.
sudo apt-get install evtest
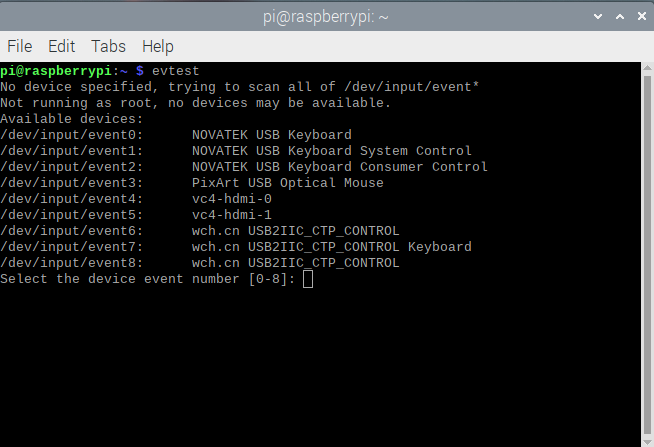
It will prompt at some point to continue. Type Y and hit enter. After it installs, you should be able to run evtest by simply typing evtest in a terminal window. I didn’t need to use sudo to run it, but in some threads I’ve read, they suggest that you need to run it with sudo. When it runs, it will display a numbered list of all the hardware it detects and lets you select which one to test by entering the corresponding number. In the example below, the number we need to choose is 6. It might not be super obvious which one you need so you may find that you need to exit the terminal and run evtest again and again until you figure out which one is the touch input.
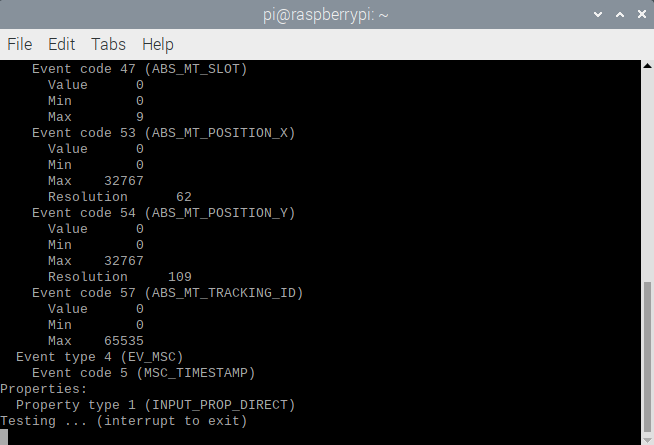
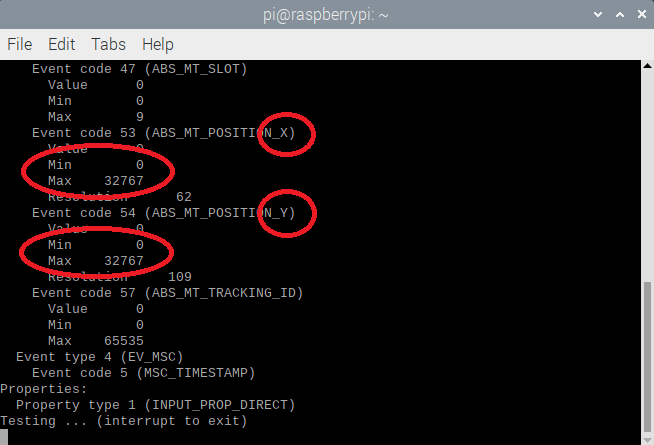
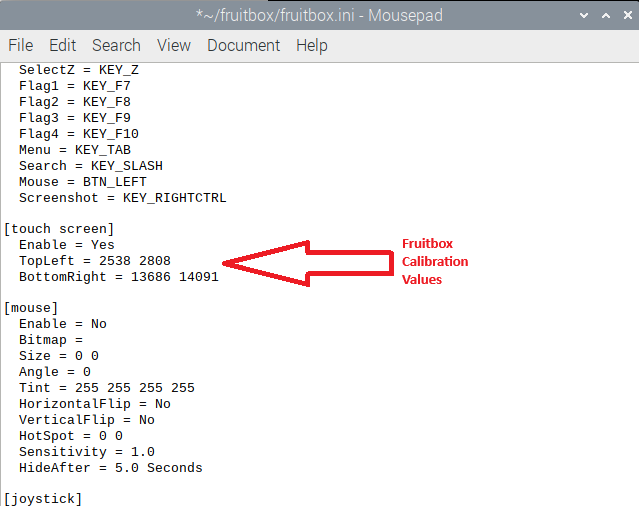
Look for the X and Y values. You want the min (should be zero) and the max values. This is the touch resolution you’ll need to enter into fruitbox.ini.
At this point we are done with evtest, but if you want to see something cool, touch the screen somewhere and you’ll see evtest start rapidly displaying coordinates in the terminal. You can close the terminal window running evtest. Note: evtest is a pretty nice utility. You can run it and select a keypad for instance and get the key names by pressing the buttons. These key names can then be added to fruitbox.ini in the button section to control fruitbox button functions. This is especially helpful if you need key names for gpio keys on a Pi5 since editing the buttons within Fruitbox is currently broken on Pi5 boards.
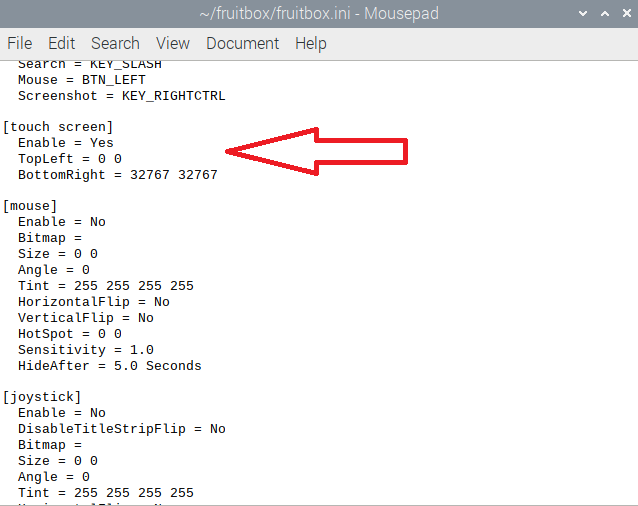
Next you’ll want to open fruitbox.ini and find the touch section.
At this point you should have a working touchscreen in Fruitbox. Fire it up and try it out. Make sure you are trying it on a touch enabled skin. You can browse the available skins here. https://fruitbox4dummies.com/fruitbox-skin-image-library/gallery/fruitbox-v2-official-skins/
Hope this helps someone – Jay