
Guide revision 2.2 – Jay Thompson
IMPORTANT NOTICE! Raspberry Pi OS Bookworm released on July 4th 2024 breaks Fruitbox functionality. To get around this, either use Bullseye OS released on or before July 4th, or download and install the March 15 version of Raspberry PI OS Bookworm. https://downloads.raspberrypi.com/raspios_arm64/images/raspios_arm64-2024-03-15/
Introduction
This Dummies Guide will show you how to install Fruitbox V2 on a Raspberry Pi4 or Pi5 including additional things you might find useful with your setup. This guide is specifically for the GUI version of Raspberry Pi OS – Bullseye (instructions on the new Bookworm OS noted). Due to some dependencies that Fruitbox uses, the CLI version of Raspberry Pi OS (Buster) and Fruitbox is not compatible with the Pi4, so we will need to use the GUI version. I’ll show you how to install either the 32 or 64 bit version and a way to boot it directly into Fruitbox. A lot of this is from Mike Kingsley’s instructions on the Fruitbox Github, and the rest is information I have used in the past. Every time I do a fresh build, I need to look some of this stuff up, so why not store it all in one place? Some of this I don’t use but I thought it might be useful to include as a reference. *PLEASE READ THE DISCLAIMER AT THE BOTTOM OF THIS PAGE
- Introduction
- How to use this guide – Please read
- Imaging the Micro-SD Card
- Misc optional settings to consider before (or after) installing Fruitbox
- Installing Fruitbox
- Setting the Music Directory in the Fruitbox.ini file
- Running Fruitbox – basic commands
- Autostart – Setting Fruitbox to automatically load when the pi starts up (optional)
- Reboot the pi every day at a specified time (optional)
- Miscellaneous optional things to help if you’re unfamiliar working with Raspberry Pi computers
- Some other recommendations – For Desktop GUI versions of Raspberry pi OS only
- Making sense of, and editing, fruitbox.ini
- Fruitbox.ini – General Settings
- Fruitbox.ini – Changing the default skin that Fruitbox loads
- Fruitbox.ini – Enabling the Skin Chooser
- Fruitbox.ini – Advanced Skin Chooser Options
- Fruitbox.ini – Attract Mode (Formerly Autoplay in V1) defaults and options highlighted
- Fruitbox.ini – Default Buttons – informational
- Troubleshooting: Common Issues and Fixes
- Bonus section
- How to install a power button on your Raspberry Pi3 or Pi4
- Start Fruitbox with a single button press – Bullseye OS.
- Start Fruitbox with a single button press – Bookworm OS (Wayland backend)
- Start Fruitbox with a single button press – Bookworm OS (X11 backend)
- Start Fruitbox from a shortcut on your desktop (helpful for touchscreens)
- Changes from previous version of this guide
- Acknowledgments
- Diagrams
- Past guide revisions
- DISCLAIMER
How to use this guide – Please read
Below are some tips to help you get the most out of this guide.
If it has a red background it is a very important step not to be ignored. Black backgrounds are commands you’ll enter so you can easily follow along (*click to copy, and paste into the terminal). Blue backgrounds are default Fruitbox settings. Yellow backgrounds are non-default settings worth considering. Green backgrounds denote updated instructions from the previous dummies guide. Grey backgrounds are helpful tips and comments.
To make this guide even dumberer, I’ve enabled click to copy on all commands. Open this webpage on your pi and you can copy/paste everything right into the terminal. Now you can’t mis-type anything. If this was any dumber, I’d just give you access to a pre-built image….
Fruitbox V2 is capable of playing video files in OGV format. Results may vary, but in all my tests, it it not worth bothering with as videos can stutter or not play at all half the time. Because of this, this guide does not go over video playback.
RANT WARNING!
Stick to the script! I’ve tried to be very literal when writing this guide. With that said, do not make changes to the operating system or basic Pi setup and expect my instructions to work.
A few examples of going off script include:
- Setting the GUI version of Raspberry Pi OS to launch in CLI mode, and wonder why Fruitbox won’t launch properly. Fruitbox v2 (version 2.04) has to be ran in GUI mode on Pi4 and Pi5. It is not written anywhere to change to the CLI.
- Changing from Wayland to X11 backend in OS bookworm before getting your Fruitbox running.
- Adding a DAC hat before getting you Fruitbox running.
- Plugging in a hard drive when I have only said to plug in a thumb drive before getting your Fruitbox running.
- Using a thumb drive to boot from instead of a micro-SD card.
Please use a modern computer monitor during setup. TVs sometimes have weird resolutions that can mess with the install. Prerequisite hardware for these instructions to work – a Raspberry Pi, a micro-SD card (At least 4GB), an official Raspberry Pi power supply, and a thumb drive formatted to fat32 with your music on it. As I mentioned before, you will need a modern computer monitor and initially will need a keyboard and a mouse. These instructions do not go over DAC hats or touchscreen setups. It is completely fine to use these, but please setup your Fruitbox and get a working knowledge of the software before installing those.
These instructions might seem a little extreme, but we want a good baseline of where you are at if something doesn’t work as expected. I can’t explain enough how many hours of helping troubleshoot issues (sometimes with very ungrateful people I might add), when their issues could have been avoided by just sticking to the instructions, or by not leaving out facts about how they got stuck to begin with. I don’t care if you are brand new or a seasoned veteran, please stick to the script!
Imaging the Micro-SD Card
I’ve made a basic video on how to image an SD card to use in your PI with Fruitbox. https://youtu.be/a5aUGGmsjE8
Per Mike Kingsley on the Fruitbox Github page: Fruitbox for Raspberry Pi4 only runs under the Raspberry Pi OS Desktop version (not Lite). Both 32-bit and 64-bit versions of Fruitbox are available so we can use either 32 or 64 bit Raspberry Pi OS. Personal opinion: if you’re only using your Pi for Fruitbox, I’d recommend the 64 bit version. It just seems to run a little smoother. Update: Raspberry PI OS Bookworm tested and works with a couple extra steps noted below. Pi5s seem to work just like a pi4 with a couple of exceptions – at the time of this writing, the Configure Buttons tool in the Fruitbox menu is broken. The GPIO in Pi5s is different and does not work with the currently compiled versions of Fruitbox. A workaround is to edit the [buttons] section directly within fruitbox.ini (but you won’t be able to assign GPIO buttons unfortunately). Also, setting the GPU Memory to 256 is un-necessary on Pi5s
*When you first boot, set the default username as pi, but change the PW to whatever you want. The rest of this guide depends on having pi as the username. Make no other custom preference changes until after you get Fruitbox running. The steps below are in the sequence you should follow to ensure a successful installation. Also, Fruitbox.ini will not exist until you run Fruitbox at least once, so make sure you follow the install steps completely before trying to make any other changes with Fruitbox itself.
Misc optional settings to consider before (or after) installing Fruitbox
I make these changes after the first boot of the newly imaged Raspberry Pi before installing Fruitbox. Don’t be too overwhelmed by this section, you can always come back.
Set up wireless network connection: This is usually set up on first boot, but this is how you can set it up or change it. From a command shell, type – sudo raspi-config-> System Options -> Wireless LAN > enter your SSID (name of your wireless network) and passphrase. You can also change this from the menu bar. If you didn’t set this up on first boot, you can turn this on or make changes by clicking on the network connection icon on the task bar.
Change the PW: From a command shell, type – sudo raspi-config -> System Options -> Password. You can also do this from the Task Menu (Start Button for lack of a better term) select Preferences and click Raspberry Pi Configuration. In the System Tab, Click Change Password. Leave the hostname set as pi.
Turn on SSH: From a command shell, type – sudo raspi-config -> Interface Options > SSH then select yes (you should also change the default PW afterwards -> System Options -> Password) You can also do this from the Task Menu (Start Button for lack of a better term) select Preferences and click Raspberry Pi Configuration. Click the Interfaces Tab and click on the SSH slider to turn it on.
Change between the Wayland and X11 backends in RPI OS Bookworm: Fruitbox was not designed to work on the Wayland backend system but with a few tweaks we can make Wayland work. If you prefer and have need of it, you can switch back to the X11 backend that previous versions of RPI OS used. To do this, open a terminal and type sudo raspi-config. In raspi-config, select option 6, advanced options. In advanced options select A6 Wayland. In Wayland select Openbox window manager with X11 backend. You’ll probably have to restart at this point. Personally, I think the Wayland system works just fine and see no reason to go back to X11, and In my opinion, if you are going to use the X11 backend, you might as well just install Bullseye (unless you are using a Pi5 which requires the newer Bookworm OS). Another opinion, Wayland works just fine. You should use it. As far as Fruitbox goes, the only reason I can see that you would need to switch back to X11 would be a piece of hardware like a DAC or touchscreen that requires it.
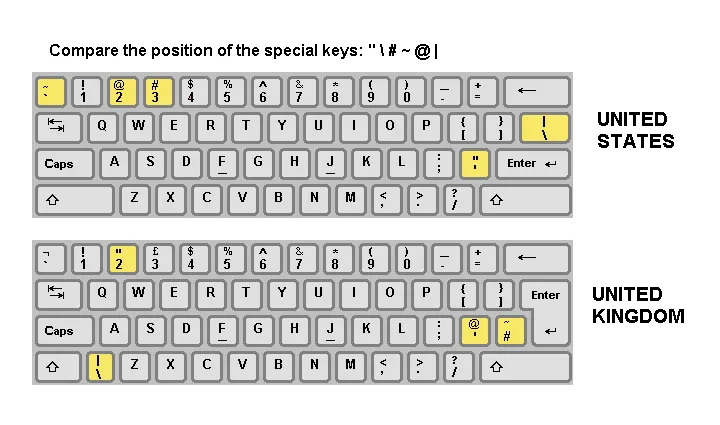
Change the type of Keyboard: The keyboard is set up on first boot but this is how you can change it. If you are in the US, you should set the keyboard to US. Raspberry Pi defaults to UK (I think). Most of the keys are the same, but you may find yourself in a situation where you get an unexpected character while typing something. – From a command shell, type – sudo raspi-config -> Localization Options -> Keyboard. For me the next screen is Generic 105 key PC – yours may be different. On the next screen you’ll see English UK is already selected. Scroll down to other -> then change the next screen from English UK to English US. Next screen select English US unless you have a specialized Dvorak keyboard or something like that. Next screen select default. Next screen select no compose key. You can also do this from the Task Menu (Start Button for lack of a better term) select Preferences and click Raspberry Pi Configuration. Click the Localization Tab. In this tab click the Set Keyboard button.
Installing Fruitbox
For Raspberry Pi version 4 (and 5). These directions are directly from the Fruitbox V2 readme file on the Fruitbox Github page.
Fruitbox only runs under the Raspberry Pi OS Desktop version (not Lite) on Pi 4s. Both 32-bit and 64-bit versions of Fruitbox are available.
Increase GPU memory to (at least) 256 From a command shell, type – (sudo raspi-config -> Performance Options -> GPU Memory) Note raspi-config can also be used to set up Wi-Fi and enable SSH for transferring files from PC to Pi via WinSCP for example. *Changing the GPU Memory does not appear to be an option with Raspberry Pi Bookworm.
For 64-bit desktop…
From a command shell, type : wget https://github.com/chundermike/rpi-fruitbox-v2/raw/main/install_fruitbox_pi4 and press enter *Nevermind that it says Pi4, this works with Pi5 also. From a command shell, type : chmod +x ./install_fruitbox_pi4 and press enter From a command shell, type : ./install_fruitbox_pi4 and press enter
For 32-bit desktop…
From a command shell, type : wget https://github.com/chundermike/rpi-fruitbox-v2/raw/main/install_fruitbox_pi4_32 and press enter *Works with Pi5 also. From a command shell, type : chmod +x ./install_fruitbox_pi4_32 and press enter From a command shell, type : ./install_fruitbox_pi4_32 and press enter
Copy your music MP3 files either to the SD card /home/pi/Music directory, or to a USB memory stick. Fruitbox looks for music files in the /home/pi/Music directory on the SD card by default. If you want to use the Pi’s /home/pi/Music directory, you can upload mp3s via FTP or copy them from a thumb drive.
Run fruitbox… From a command shell, type : cd /home/pi/fruitbox and press enter. Next type : ./fruitbox and press enter
You’ll probably see an error about Fruitbox not able to find music. We’ll get to that in the next section.
*Required on RPI4. Increase GPU Memory: From a command shell, type – sudo raspi-config -> Performance Options -> GPU Memory. Set this to 256. Setting it higher can in some cases cause your pi to not boot up. *This setting does not appear to be applicable in Raspberry Pi OS Bookworm which excludes RPI5s from this requirement.
The following instructions depend on the fruitbox.ini file being present. This file is not created until you run Fruitbox at least once (see the Run Fruitbox step above).
Setting the Music Directory in the Fruitbox.ini file
Option 1. Preferred method: Where to put your Music – No songs found error. Open your fruitbox.ini file and find the line MusicPath = ../Music. Add a new line under that and type MusicPath = /media/pi . Save the file. Insert your usb stick with your music pre-loaded on it. I suggest your thumb drive to be FAT32 formatted. Run Fruitbox and see if it can find music. If so, it should create a database of all the songs the first time it is used. The next time Fruitbox is loaded it will read and load the songs from the database. If you add more music, Fruitbox *should* notice something is different and a new database will be created. You could also delete the database (fruitbox.db) and Fruitbox *should* create a new one.
About the music paths on your thumb drive… Your MP3s should be placed in a folder on the drive, not in the root of the drive. If you want be specific about where Fruitbox looks for the music you could have separate folders and have Fruitbox only look in those folders. For example MusicPath = /media/pi/Christmas_Music. If there is a Christmas_Music folder on the drive, Fruitbox will play from that folder and ignore any other folders on the drive unless they are also specifically called out in the ini file. If you have MusicPath = /media/pi as the path, this is considered the root path of the drive and Fruitbox will look for music in all folders on the thumbdrive and will create database files for the music files found in them.
Option 2. Not recommended method: If Fruitbox still doesn’t find songs and/or doesn’t create a database, this will let you automatically mount a USB memory stick on power up and create database if one is not present: Important Note, Once this is set, your pi might not boot without a thumb drive present. If so, and you want to boot without it, you’ll need to undo these changes. I highly suggest trying option 1 first.
At a command shell type: sudo mkdir -p /mnt/usb then press enter
At a command shell type: sudo nano /etc/fstab then press enter
When inside the nano editor, add the following line at the end of the table…
/dev/sda1 /mnt/usb vfat uid=pi,gid=pi defaults,nofail 0 0
In the line above, the spaces are intended to be separated by the tab key. Save (Ctrl-X), then Y, then enter
Now open your fruitbox ini file. In a teminal window type cd /home/pi/fruitbox then press enter. Next type sudo nano fruitbox.ini find the line MusicPath = ../Music. Add a new line under that and type MusicPath = /mnt/usb Then Save (Ctrl-X), then Y, then enter.
Now when you plug in a new thumb drive and reboot the Pi, the Pi will automount the thumb drive and Fruitbox will search for a database. If a Database is not found, it will create a new one.
To test if Fruitbox can see your music, you’ll need to reboot.
Informational: You can completely ignore this section if you want to use the Music folder on your Raspberry Pi since that is the Fruitbox default folder. That is totally OK, but you’ll need to use FTP, a thumb drive or some other means to get your music on it. Also, (not really applicable here but) the command line version of Raspberry Pi (Buster) doesn’t include a Music folder by default so that’s something else to consider.
Running Fruitbox – basic commands
Once you have Fruitbox installed and the music directory set within the ini file, from a command terminal, type : cd /home/pi/fruitbox then press enter. Next type : ./fruitbox . This will open Fruitbox and run whatever skin is listed in Fruitbox.ini (the default skin is SB-M100).
If you know the name of the skin you want to run, just add it to the end of the command with the –skin option. Example: ./fruitbox --skin skins/Modern/fruitbox.ini
You could also have your skin on the same thumb drive as your music and launch that. Example: ./fruitbox --skin /media/pi/MUSIC/MagicOfChristmas/fruitbox.cfg This will launch a skin called the Magic Of Christmas directly from the thumb drive.
If you would like to tell Fruitbox to launch and search for music from a different folder than what is specified in the ini file, you can launch it with the –music-path command. Example: ./fruitbox --music-path ../Videos This will tell Fruitbox to search for music (or videos) in the /home/pi/Videos folder
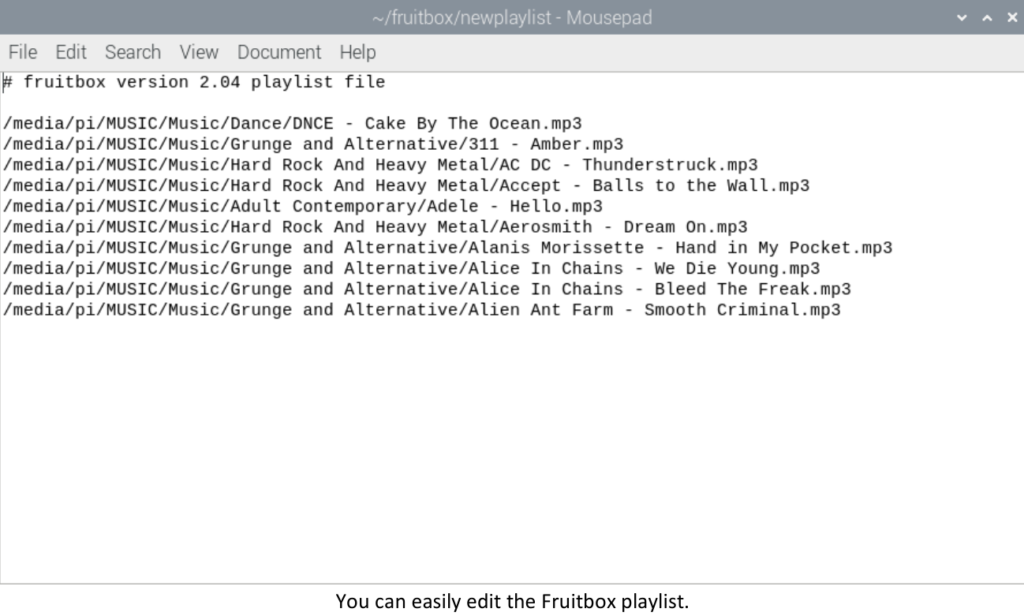
If you’d like to create and use playlists, use the –save-playlist –load-playlist commands Example: ./fruitbox --save-playlist newplaylist will save a playlist titled newplaylist with whatever is in the song queue when you exit Fruitbox via the exit key. To load Fruitbox with that playlist, type ./fruitbox --load-playlist newplaylist *Once saved, you can edit this playlist by hand.
There are even more commands you can use such as ./fruitbox --user-guide which will create the Fruitbox userguide. ./fruitbox --help will display a list of commands you can use. A semi-secret command I use all the time is ./fruitbox --no-splash. This command suppresses the splash screen and allows Fruitbox to boot up quicker. Very helpful for skin development. *Caution, this command has been know to cause weird behavior if used in autostart scenarios as it causes Fruitbox to load before the system has a chance to completely load. If you use the skin chooser in Fruitbox, –no-splash is probably OK to use with autostart as the chooser gives the OS time to load everything.
Autostart – Setting Fruitbox to automatically load when the pi starts up (optional)
RPI Bookworm autostart method
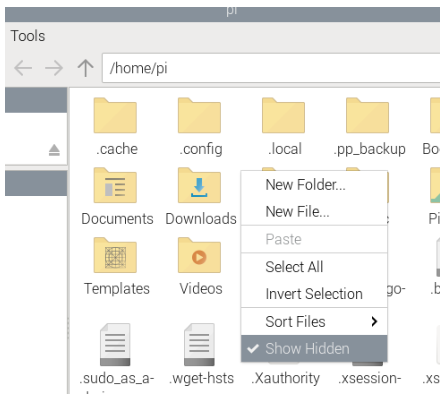
Setting autostart in the Raspberry Pi Bookworm OS using the Wayland backend is extremely easy. Open a command terminal and type nano /home/pi/.config/wayfire.ini *note: if editing this from the GUI, you will have to right click inside the /pi folder and check Show Hidden in order to be able to see the .config folder.
At the very bottom of the wayfire ini file, add
[autostart]
fruitbox = cd ~/fruitbox && ~/fruitbox/fruitbox
(pay special attention to all the spaces)
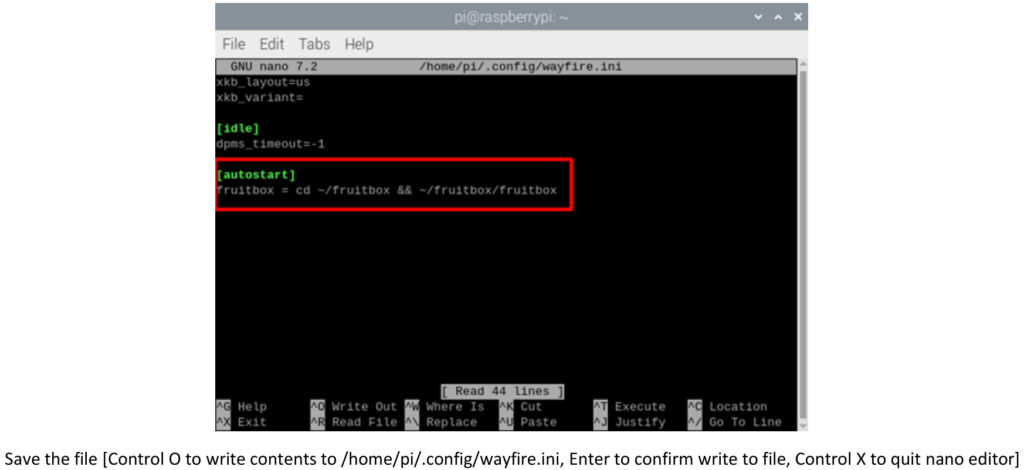
That’s it. Reboot to verify Fruitbox launches.
RPI Bullseye autostart method [or Bookworm if using the X11 backend]
This method requires creating a new bash script. We’ll also copy the default autostart file and place it in its own directory.
1. Create the bash script: At a command shell navigate to pi folder by typing: cd /home/pi/ then press enter
Create a file and open the editor: At a command shell type: nano /home/pi/myfruitbox.sh and press enter
Once the editor opens add/type the following:
#!/bin/bash
cd ~/fruitbox && ~/fruitbox/fruitbox
NOTE: Formatting is important here. The ‘shebang’ above must be on the very first line of the file (line 2 won’t do, even if the first line is blank). There must also be no spaces before the # or between the ! and the path to the interpreter.
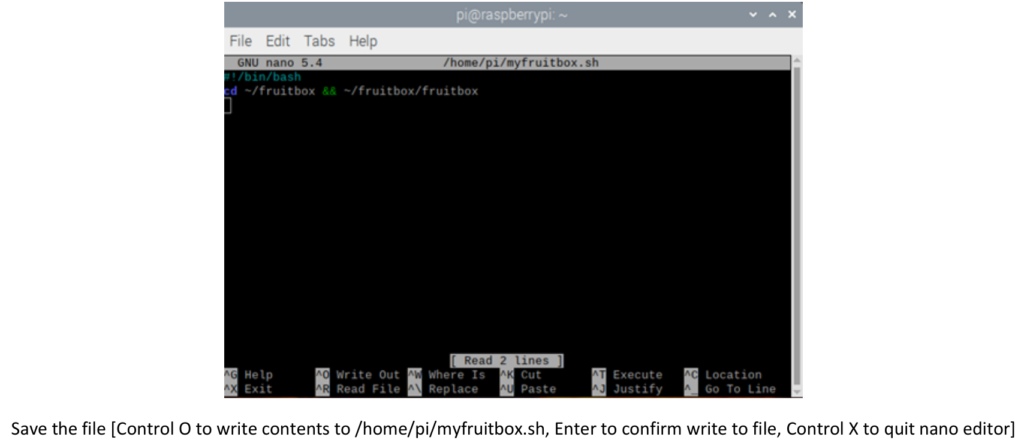
After saving the Bash script, we need to make it executable: At a command shell type: chmod 755 myfruitbox.sh and press enter
2. Create the user’s session configuration directory: At a command shell type: mkdir -p /home/pi/.config/lxsession/LXDE-pi the press enter
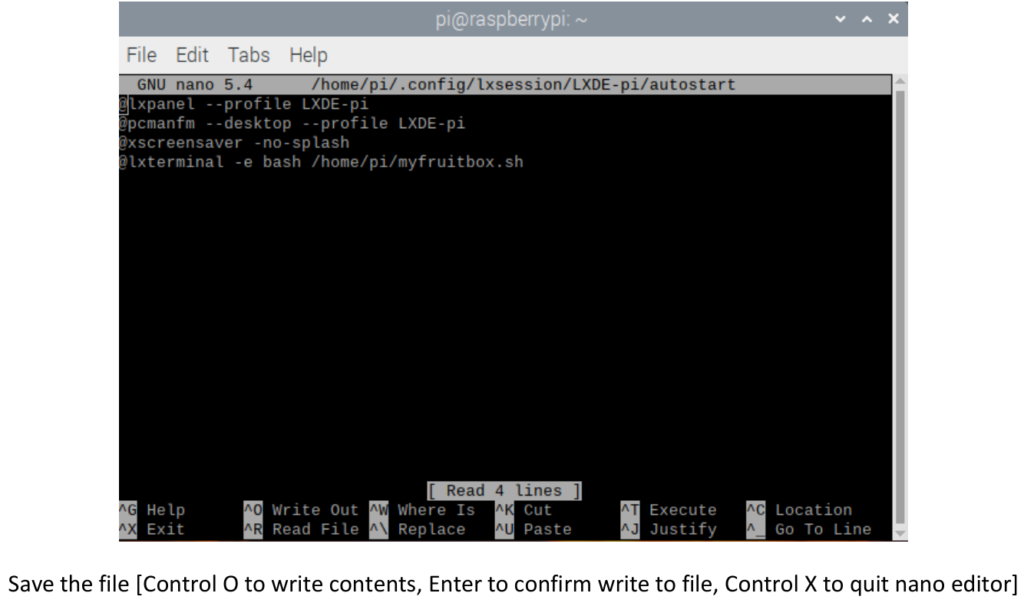
3. Copy the default autostart file into the directory created above and edit it:
At a command shell type: cp /etc/xdg/lxsession/LXDE-pi/autostart /home/pi/.config/lxsession/LXDE-pi/ Pay attention to the space between autostart and /home (copy/paste is a good idea here)
Open the editor – At a command shell type: nano /home/pi/.config/lxsession/LXDE-pi/autostart then press enter
Note: This should not require root or sudo.
Add the following command to the bottom of the list: @lxterminal -e bash /home/pi/myfruitbox.sh
Reboot the pi every day at a specified time (optional)
From a command terminal type: sudo crontab -e and press enter Press #1 to choose the nano file editor (if this is the first time opening it). Then press the down arrow to scroll to the very bottom. Enter this command to schedule a reboot. This command will schedule a daily reboot at 6:30am.
30 6 * * * /sbin/shutdown -r now
Save (Ctrl-X), then Y, then enter. If you want to automatically reboot your raspberry pi at a different interval using minutes and hours (for example, 1:03pm), the command you’d enter would look like this:
03 13 * * * /sbin/shutdown -r now
You can also set it to reboot with the @daily expression and it will reboot every day at midnight.
@daily /sbin/shutdown -r now
Raspberry pi runs 24 hr military time.
Fruitbox is pretty stable, but in my experience, l find if I let it run for several days at a time it will get bogged down or the Pi will run out of memory and kill the process. A daily reboot is easy to do and has worked well for me.
Miscellaneous optional things to help if you’re unfamiliar working with Raspberry Pi computers
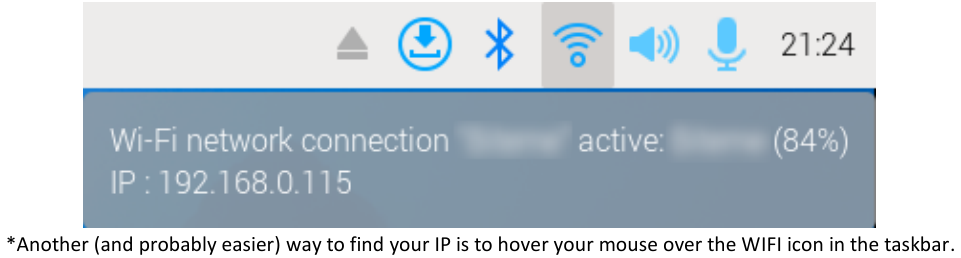
How to find your IP address
From a command terminal: type ifconfig to view IP address info. Your IP address will probably be something like 192.168.0.xxx or something very similar if on a private network that uses DHCP to assign addresses. It will be listed on one of the inet lines. If all you see are loopback addresses (127.0.0.1) , then you are probably not connected to the network.
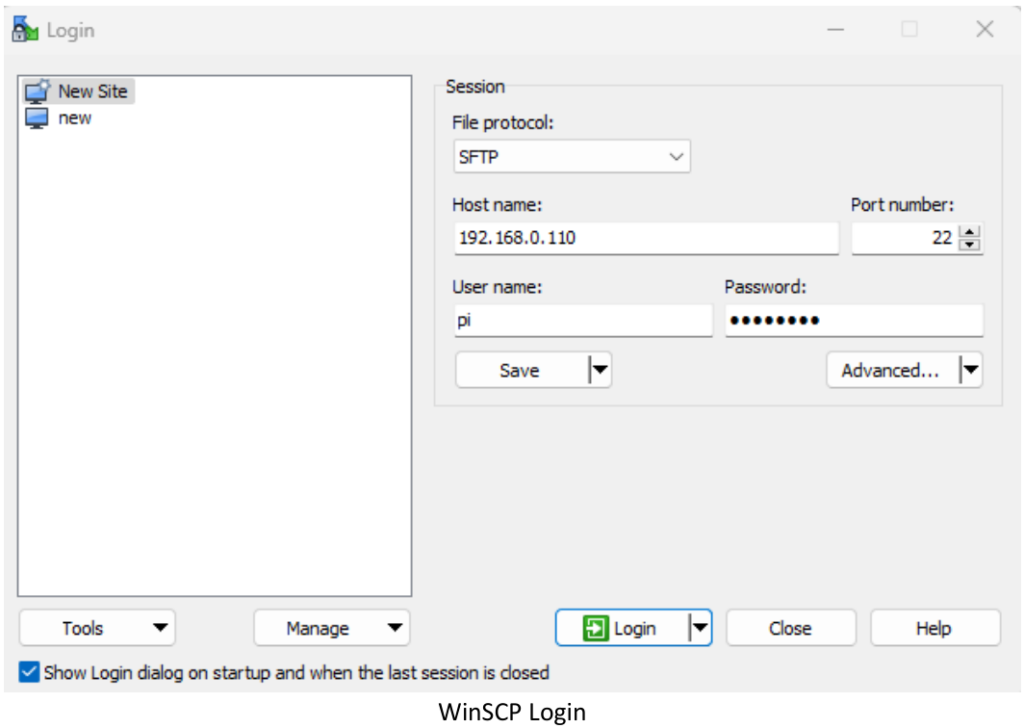
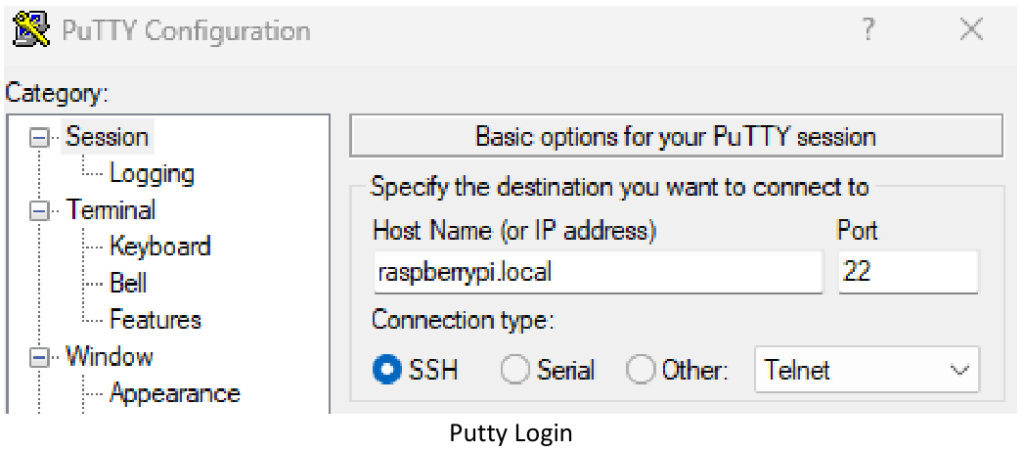
Using IP address and/or raspberrypi.local to connect with FTP client and/or Putty via Windows
If using Filezilla, WinSCP, or Putty from a Windows desktop, you can connect to the IP address we found in the steps above (or raspberrypi.local if it’s the only Pi on your network). Make sure also that you have enabled SSH (sudo raspi-config -> Interface Options > SSH then select yes). Enter the Host, Username, PW and port 22 and click connect. If you are still using default login PW, you should seriously consider changing it. (sudo raspi-config -> System Options -> Password)

To connect a remote shell into the pi from Windows to run commands, you can use a program on Windows called Putty. In Host Name, enter the IP address or (raspberrypi.local if the only pi on your network) and Port 22. Connection type is SSH. Enter your login credentials. If you are using SSH, and are still using the default login PW, you should seriously consider changing it (sudo raspi-config -> System -> Options -> Password), or turn off SSH altogether. See ‘To turn on SSH’ in the Misc setup notes below to access the SSH enable/disable menu.
Some other recommendations – For Desktop GUI versions of Raspberry pi OS only
Hide the Menu Bar RECOMMENDED Raspberry Pi OS Bookworm with the default Wayland backend.
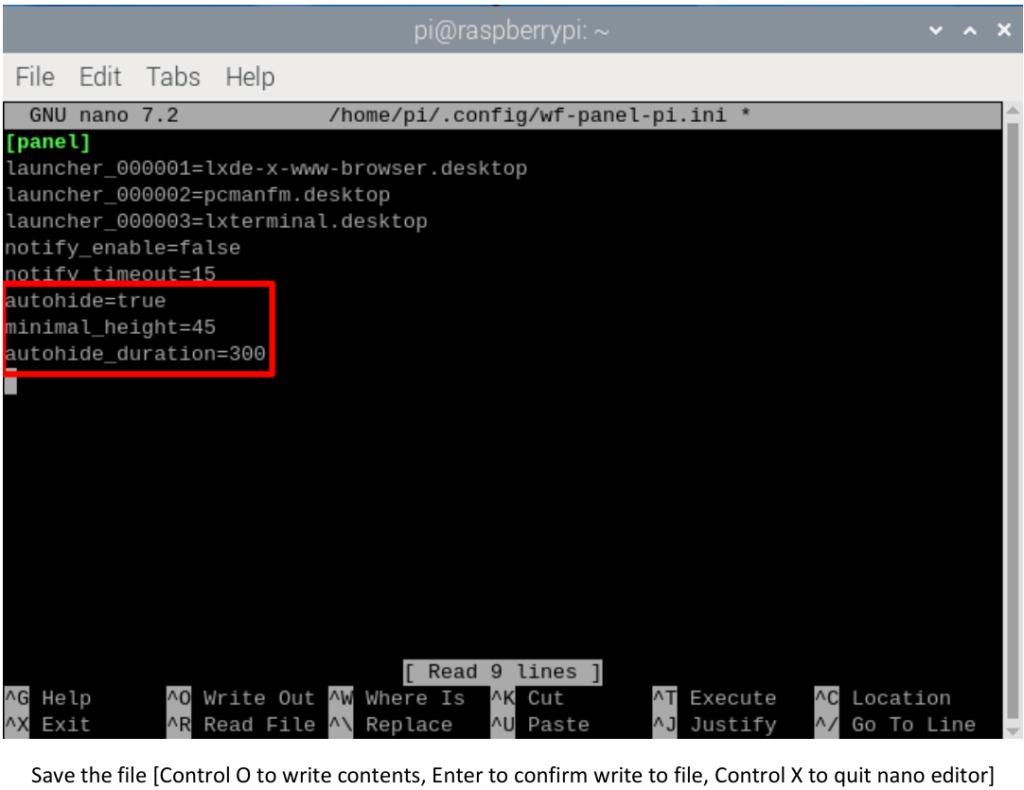
The controls to hide the taskbar are not present like in Bullseye. You’ll need to edit wf-panel-pi.ini. In a terminal window, type nano /home/pi/.config/wf-panel-pi.ini and press enter. Inside the editor, add to the bottom of the file…
autohide=true
minimal_height=45
autohide_duration=300
Note: this can break widget functionality if you have any widgets running on the taskbar.
Hide the Menu Bar RECOMMENDED Raspberry Pi OS Bullseye (or Bookworm if using the X11 backend).
This will prevent the top and bottom of Fruitbox from being cropped.
Right click the menu bar and click Panel Settings. Click Advanced and check the Minimize panel when not in use check box. Under size when minimized, set it to zero pixels. (This may become a mandatory setting when Fruitbox with Dual monitor support comes out.)Hide the Menu Bar *RECOMMENDED* Raspberry Pi OS Bookworm with the default Wayland backend. This will prevent the top and bottom of Fruitbox from being cropped.
Hide system notifications
Right click the menu bar and click Panel Settings. Click Notifications and un-check the Show Notifications check box.
Disable Raspberry Pi Splash Screen:
I don’t care to see the splash screen when my Pi boots up. Luckily we can turn this off. From a command shell, type – sudo raspi-config -> System Options -> Splash Screen -> no
Making sense of, and editing, fruitbox.ini
Fruitbox.ini – General Settings
Fruitbox default settings highlighted in blue. Optional settings you may consider using are highlighted in yellow.
[general]
MusicPath = ../Music – Change to /media/pi to automatically use the thumb drive. You can have more than one MusicPath line here if you want Fruitbox to look in more than one place (see note on MusicPath below for more info).
MaxPlayQueueLength = 20 – Maximum songs you can queue at a time. Change this to what you like.
LoopPlayQueue = No – Change to Yes to enable the songs that are queued to be repeated. This setting can be toggled with the F11 key or touch screen if enabled in the skin. Note: This setting is ignored if NoDuplicates is enabled in the skin file.
IgnoreArtistPrefixThe = Yes – Yes = ignore the word ‘The’ in artist names for alphabetizing purposes. Example: The Doors would be alphabetized as simply, Doors. Set to No if you want to have artists with the word ‘The’ as the first word in their name.
SongHistoryDepth = 20 – Determines the search range of number of previously played songs to ensure no repeated songs are chosen in Attract mode or Random selection. If not specified or set to 0, fruitbox will only check for repeated songs from within the play queue
SongHistoryIncludeUserSelection = No – Yes or No – User selection is included or excluded from the history search
SongVolume = 50 Initial volume when Fruitbox starts. Can be adjusted with the – and = keys, or touchscreen controls if enabled in the skin file. Set this to 0 if you have attract mode on and don’t want to wake up the neighbors when Fruitbox loads.
SongVolumeStep = 10 – Song volume step (0..100) (amount changed for VolumeUp / VolumeDown). When set at 10, the steps will be 10%, 20%, 30%, 40%, etc – 100% volume.
ReplayGain = None – Can be set to none, track, album (automatic gain adjustment – requires MP3 ReplayGain tag data) See https://mp3gain.sourceforge.net/ for info.
FreePlay = Yes – Set to No to require coin input to be toggled for song selection
CreditsPerCoin1 = 1 – number of song credits added when a coin is inserted. Toggled with F1 key or Touchscreen controls.
CreditsPerCoin2 = 2 – number of song credits added when a coin is inserted. Toggled with F2 key or Touchscreen controls.
CreditsPerCoin3 = 5 – number of song credits added when a coin is inserted. Toggled with F3 key or Touchscreen controls.
CreditsPerCoin4 = 10 – number of song credits added when a coin is inserted. Toggled with F4 key or Touchscreen controls.
CreditsPerCoin5 = 25 – number of song credits added when a coin is inserted. Toggled with F5 key or Touchscreen controls.
CreditsPerCoin6 = 100 – number of song credits added when a coin is inserted. Toggled with F6 key or Touchscreen controls.
CreditsPerSong = 1 – Number of song credits required to play one song
MenuColour = 255 255 255 – <r> <g> <b> Modify the on-screen menu colour
MenuBackgroundColour = 32 32 32 200 – <r> <g> <b> <a> Modify the on-screen menu background colour
SkinChooserTimeout = 0.0 Seconds – increments can be in ticks, seconds, minutes, hours – The time before Fruitbox loads the current skin if no choice is made. A value of zero or not defined disables the timeout and leaves the skin chooser open forever or until a skin is selected.
A Note on the Music Path: You can specify the music path in more locations for Fruitbox to search, just add a new MusicPath = line for each location. Fruitbox will simply look in each location. You won’t see a *no music found* error if it finds music in at least one of the locations you specify. Example: MusicPath = ../Music MusicPath = ../Videos MusicPath = /mnt/usb MusicPath = /media/pi
Also, if you had one skin that you wanted to only search for Videos for instance, put the music path in the skin’s cfg file itself and Fruitbox will only look in that location. MusicPath = ../Videos
Fruitbox.ini – Changing the default skin that Fruitbox loads
The default skin that loads with Fruitbox V2.04 is the SB-M100 skin. To change it, specify a different skin in the [skins] section of fruitbox.ini.
[skins] File = skins/SB-M100/fruitbox.cfg Change to something else like… File = skins/Modern/fruitbox.cfg
Fruitbox.ini – Enabling the Skin Chooser
By default, the skin chooser is disabled as there is only one skin specified in the fruitbox.ini file (SB-M100). To enable the skin chooser, you need to specify the skin configs you want to use in the fruitbox.ini file. Below is the full list of available skins as of the time of this writing, July 2024 (these skins are already downloaded with Fruitbox, you just need to point to them in the ini file). A good autoboot solution is to set SkinChooserTimeout = 20.0 Seconds (See Fruitbox.ini – General Settings section above) and place the skin you usually want to boot into at the top of this list. This way you can boot into the skin chooser and use it to choose skins, or have an unattended scheduled reboot happen and for the skin chooser to time-out and run the skin you have at the top of your skins list. For example, the list below will run the WoodysJukebox skin after the skin chooser screen times out. (For auto rebooting info, see step, Reboot the pi every day at a specified time).
| [skins] File = skins/WoodysJukebox/fruitbox.cfg File = skins/AlbumPlayer/fruitbox.cfg File = skins/AlbumPlayer/fruitbox-pb.cfg File = skins/Aluminium/fruitbox.cfg File = skins/ArcadeJoy/fruitbox.cfg File = skins/BigBobsMillions/fruitbox.cfg File = skins/CDPlayer2000/fruitbox.cfg File = skins/Cassette/button_fruitbox.cfg File = skins/Cassette/touch_fruitbox.cfg File = skins/City-II-1080/fruitbox.cfg File = skins/City-II-UltraWide/fruitbox.cfg File = skins/Classic/fruitbox.cfg File = skins/Dynomite/fruitbox.cfg File = skins/FB-M100/fruitbox.cfg File = skins/Fallout-1080/fruitbox.cfg File = skins/FrankieSayRelax/fruitbox.cfg File = skins/IndieGloJunior/fruitbox.cfg File = skins/IndieGloJunior/fruitbox_blue.cfg File = skins/IndieGloJunior/fruitbox_green.cfg File = skins/IndieGloJunior/fruitbox_orange.cfg File = skins/IndieGloJunior/fruitbox_red.cfg File = skins/IndieGloJunior/fruitbox_violet.cfg File = skins/IndieGloJunior/fruitbox_yellow.cfg File = skins/JaysBigScreen/fruitbox.cfg File = skins/JaysCDJukebox/fruitbox.cfg File = skins/JaysIndieglo/fruitbox.cfg File = skins/JaysMoldyOldies/fruitbox.cfg File = skins/LowerDecks/fruitbox.cfg File = skins/LowerDecks/touch_fruitbox.cfg File = skins/MacFarlane/fruitbox.cfg File = skins/MacFarlane/fruitbox-pb.cfg File = skins/Mahogany/fruitbox.cfg |
File = skins/MikeTV/fruitbox.cfg File = skins/Modern/fruitbox.cfg File = skins/Modernified/fruitbox.cfg File = skins/NewRetro/fruitbox.cfg File = skins/NumberOne/fruitbox.cfg File = skins/RadioGlo/fruitbox.cfg File = skins/RadiOldie/fruitbox.cfg File = skins/Rock-Ola-444-1080/fruitbox.cfg File = skins/Rock-Ola-444-UltraWide/fruitbox.cfg File = skins/Rock-Ola-507-Wallbox/fruitbox.cfg File = skins/Rock-Ola-Grand-Prix-II-1080/fruitbox.cfg File = skins/Rock-Ola-Grand-Prix-II-UltraWide/fruitbox.cfg File = skins/SB-M100/fruitbox.cfg File = skins/Seeburg/fruitbox.cfg File = skins/SeeburgSmall/fruitbox.cfg File = skins/SilverSky-UltraWide/fruitbox.cfg File = skins/SmallSage/fruitbox.cfg File = skins/SmallTrivue/fruitbox.cfg File = skins/Spookbox/fruitbox.cfg File = skins/Terminal/fruitbox.cfg File = skins/TouchBlue/fruitbox.cfg File = skins/TouchMiniAlbums/fruitbox.cfg File = skins/TouchOne/fruitbox.cfg File = skins/WallJuke2/fruitbox.cfg File = skins/WallSmall/fruitbox.cfg File = skins/WoodysJukebox/fruitboxtouch.cfg File = skins/Wurly/fruitbox.cfg File = skins/WurlyVideo/fruitbox.cfg |
Fruitbox.ini – Advanced Skin Chooser Options
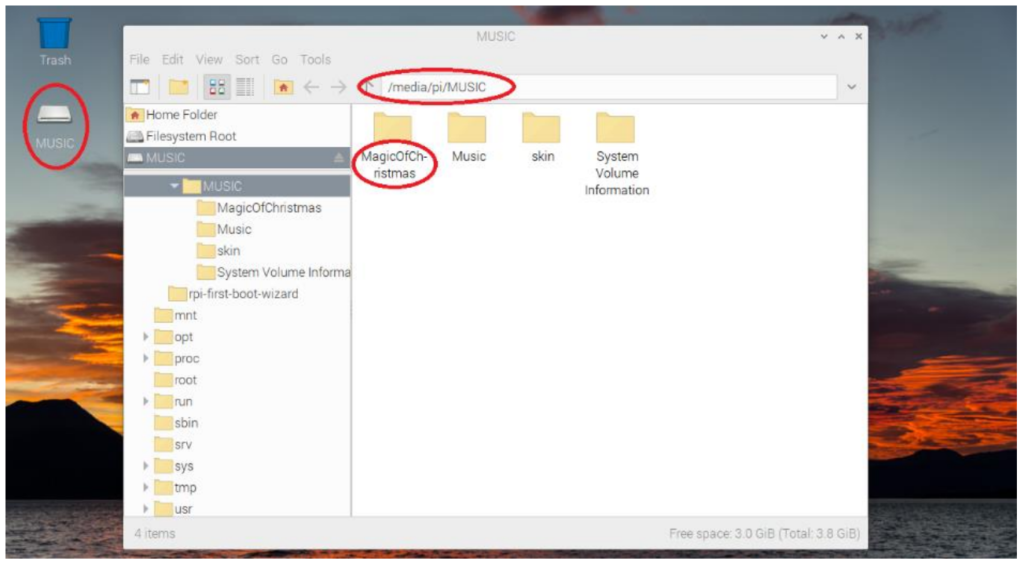
If you’re using a thumb drive for your music, you could have a skin loaded on your thumb drive and add this to the top of the [skins] list in Fruitbox.ini. This is handy for special music collections, or a Christmas collection you want to use with a specific skin.
File = /media/pi/MUSIC/MagicOfChristmas/fruitbox.cfg
In this example, Fruitbox will look for a skin named MagicOfChristmas in the root of the thumb drive. (Note: In this example, the path shown uses MUSIC as the name of the drive, not to be confused with the folder named Music that’s in the drive.) Whatever it is named, the fruitbox.ini file will need to match what the actual folder name is. Skin would be a good generic name to use if you plan on changing the skin on the thumb drive frequently and don’t want to hassle with the ini file. If there is no skin folder on the thumb drive regardless of how it is named, Fruitbox will skip (even though it is specified in the ini) it and then search for the next skin in the list. When the skin chooser screen times out, it will load whatever it can find at the top of the list. The skins section is pretty forgiving. If Fruitbox can’t find the folder specified within Fruitbox.ini, it won’t show it in the skin chooser.
Note: If you’re automounting to your thumb drive and /mnt/usb is your path, the name of the drive will probably not be needed in the path. So the example above would need the path set like this: File = /mnt/usb/MagicOfChristmas/Fruitbox
Fruitbox.ini – Attract Mode (Formerly Autoplay in V1) defaults and options highlighted
[attract mode]
Enable = No – set to Yes to enable. You can also turn attract mode off and on with the ‘ (apostrophe) key, or set in the Fruitbox menu.
Choice = Random – set to Sorted to play in the order songs are sorted.
Interval = 1.0 Minute – increments can be in ticks, seconds, minutes, hours – The time between end of song and beginning of next song.
MaxVolume = 50 – 0 to 100 – Maximum volume of attract mode song (with respect to current volume level)
FadeIn = 5.0 Seconds – increments can be in ticks, seconds, minutes, hours – Length of fade in time of attract mode song (0 = no fade in)
FadeOut = 10.0 Seconds – increments can be in ticks, seconds, minutes, hours – Length of fade out time of attract mode song (0 = no fade out)
FadeInPosition = 60.0 Seconds – increments can be in ticks, seconds, minutes, hours – Start time of attract mode song
FadeOutPosition = 70.0 Seconds – increments can be in ticks, seconds, minutes, hours – Stop time of attract mode song
SkipLoad = Yes – Set to No to turn off a skin’s song loading sequence.
*To get Random Play like Fruitbox V1 had, make these settings in Fruitbox.ini
[attract mode]
Enable = Yes
Choice = Random
Interval = 0.0 Minutes
MaxVolume = 50
FadeIn = 0.0 Seconds
FadeOut = 0.0 Seconds
FadeInPosition = 0.0 Seconds
FadeOutPosition = 0.0 Seconds
SkipLoad = Yes
Fruitbox.ini – Default Buttons – informational
There is a Reset Button Mappings tool in the Controls menu in Fruitbox. That’s assuming what you’ve changed hasn’t also broken the ability to navigate the Menu (been there). If you have, you can reset the button mappings within the Fruitbox.ini via FTP or remote shell. (*The button Mappings Tool does not work on Raspberry Pi 5s due to a change in the 5’s GPIO).
| [buttons] Quit = KEY_ESC Coin1 = KEY_F1 Coin2 = KEY_F2 Coin3 = KEY_F3 Coin4 = KEY_F4 Coin5 = KEY_F5 Coin6 = KEY_F6 VolUp = KEY_EQUAL VolDown = KEY_MINUS Random = KEY_SPACE Select = KEY_ENTER Skip = KEY_BACKSPACE Pause = KEY_SEMICOLON Up = KEY_UP Down = KEY_DOWN Left = KEY_LEFT Right = KEY_RIGHT LeftScreen = KEY_LEFTBRACE RightScreen = KEY_RIGHTBRACE LeftSort = KEY_COMMA RightSort = KEY_DOT AttractMode = KEY_APOSTROPHE LoopQueue = KEY_F11 FreePlay = KEY_F12 ClearQueue = KEY_DELETE MusicGroup = KEY_BACKSLASH Mute = KEY_LEFTCTRL PowerOff = KEY_SYSRQ Select0 = KEY_0 Select1 = KEY_1 Select2 = KEY_2 Select3 = KEY_3 Select4 = KEY_4 Select5 = KEY_5 Select6 = KEY_6 Select7 = KEY_7 |
Select8 = KEY_8 Select9 = KEY_9 SelectA = KEY_A SelectB = KEY_B SelectC = KEY_C SelectD = KEY_D SelectE = KEY_E SelectF = KEY_F SelectG = KEY_G SelectH = KEY_H SelectI = KEY_I SelectJ = KEY_J SelectK = KEY_K SelectL = KEY_L SelectM = KEY_M SelectN = KEY_N SelectO = KEY_O SelectP = KEY_P SelectQ = KEY_Q SelectR = KEY_R SelectS = KEY_S SelectT = KEY_T SelectU = KEY_U SelectV = KEY_V SelectW = KEY_W SelectX = KEY_X SelectY = KEY_Y SelectZ = KEY_Z Flag1 = KEY_F7 Flag2 = KEY_F8 Flag3 = KEY_F9 Flag4 = KEY_F10 Menu = KEY_TAB Search = KEY_SLASH Mouse = BTN_LEFT Screenshot = KEY_RIGHTCTRL |
Additional Buttons: These can be helpful if you are trying to manually edit fruitbox.ini. The below mappings are for the number pad.
Numlock = KEY_NUMLOCK
Enter = KEY_KPENTER
/ = KEY_KPSLASH
* = KEY_KPASTERISK
– = KEY_KPMINUS
+ = KEY_KPPLUS
7 = KEY_KP7
8 = KEY_KP8
9 = KEY_KP9
4 = KEY_KP4
5 = KEY_KP5
6 = KEY_KP6
1 = KEY_KP1
2 = KEY_KP2
3 = KEY_KP3
0 = KEY_KP0
. = KEY_KPDOT
Troubleshooting: Common Issues and Fixes
How to address common issues with either Fruitbox or Raspberry Pi OS
Fruitbox will not run – error while loading shared libraries: libbcm_host.so.0: cannot open shared object file: No such file or directory. This is almost certainly due to one of two things. Fruitbox was installed on Raspberry a Pi Bookworm or Bullseye release from July 4th 2024 or after – OR – you are trying to launch Fruitbox from an install that has been booted into the command line environment (CLI) and not the graphical desktop environment (GUI). The only version that will run in the CLI environment is for the Raspberry Pi3.
Using a touchscreen and there is no onscreen exit button. Try the escape key on a keyboard. If that works, there is a chance there is no on-screen exit button programmed. If that doesn’t work, try touching non-obvious areas of the screen. For example, the Woody’s Jukebox touch version uses the Woody’s logo as an exit button.
Fix black border around screen if present: From a command shell, type – sudo raspi-config -> Display Options -> Underscan, then select no *This setting does not appear to be applicable in Raspberry Pi OS Bookworm if using the Wayland backend. It’s still an option in the X11 backend.
Stop the screen from turning off: From a command shell, type – sudo raspi-config -> Display Options -> Screen Blanking then select no. OR – You can also do this from the Task Menu (Start Button for lack of a better term) select Preferences and click Raspberry Pi Configuration. In the Display Tab, click the Screen Blanking slider to turn it on.
Fruitbox stops and returns to the desktop after 20 minutes or so: See step above titled ‘Stop the screen from turning off’.
Time is Wrong: *Time is set up after first boot, but this is a way you can change it. From a command shell, type – sudo raspi-config -> Localization Options -> Timezone, select your geographic area then timezone. Time should be set automatically based on timezone selected. To check time, type “date” at command line. You’ll definitely want to make sure the time is correct if you want to do reboots on a schedule.. OR – From the Task Menu (Start Button for lack of a better term) select Preferences and click Raspberry Pi Configuration. Click the Localisation Tab. In this tab you can set the Locale and Timezone.
Change audio from HDMI to 3.5 mm jack or vice-versa: From a command shell, type – sudo raspi-config -> System Options -> Audio Raspberry Pi5s do not have a 3.5mm jack, but you can use a usb to 3.5mm adapter. You can also make changes to the audio via the audio icon in the taskbar.
Sound is terrible through the 3.5mm audio jack but crystal clear through HDMI: Open a terminal window and type sudo raspi-config. Go to advanced options. In advanced options, at the bottom, go into Audio Config. Select Pulse Audio and hit enter. Escape out until it asks if you want to reboot. Let it reboot. When it reboots, open a terminal window and type alsamixer and hit enter. Hit F6 on your keyboard and make sure Pulseaudio is showing at the card in the top left. If its not, select default at the top of the box, this should set Pulseaudio as default. Hit enter. Also, while you’re in here, press the up arrow on your keyboard to set the master volume. Escape out of alsamixer. Back to the desktop, on your taskbar, right click the volume icon. Click device profiles. Under HDMI, set that to off if you’re not currently using it or plan to use it. I’ve noticed sometimes in the past fruitbox would default to HDMI sound on boot up which is undesirable if your not using it. The AV Jack (this will say USB Audio on a pi 5 if using a usb to 3.5mm adapter) should say Analog Stereo Output.
Top and bottom of Fruitbox is cut off/cropped: Please see the topic titled Hide the Menu Bar in this guide. Hiding the Menu Bar addresses this issue.
Top of Fruitbox is cut off: Exit Fruitbox and move the menu bar to the bottom. Right click the menu bar, click taskbar preferences. On the menu bar tab, on the Position radio button, click Bottom. But do try autohiding the menu bar step mentioned above as well.
Fruitbox can’t find any of my music: See section titled setting the music directory in the fruitbox.ini file.
I see my music in Fruitbox but all the song titles are messed up or not what I expect to see: Fruitbox reads the ID3 tag metadata in your MP3s. To edit the ID3 metadata, you’ll need to use something like MP3Tag or Musicbrainz Picard to edit your MP3s. It’s easier to address this on your PC before moving the music over to your Pi.
I see music in Fruitbox but I’m not seeing album art: Fruitbox reads the ID3 tag metadata in your MP3s. The album art is embedded inside the MP3s. To edit the ID3 metadata, you’ll need to use something like MP3Tag or Musicbrainz Picard to edit your MP3s. The exception to this is album based skins. With album based skins, you’ll need each album to have it’s own folder and have a folder.jpg in each album folder. If you have a large library of albums, I have found it helpful to have Windows Media Player catalog my MP3 files as it will automatically download folder.jpgs for each folder. I am not aware of any other software that will automatically do this.
Fruitbox loads and it looks like music is there but nothing plays. This happens when mp3s are added directly to the root of the thumb drive – AND – a folder is present on the drive. For some reason when fruitbox reads the mp3s to create the database (.db) file, it puts the .db in the folder instead of next to the root files on the drive. An example would be a bunch of MP3s on the drive and a Windows System Volume Information folder is present. The solution is to either delete the System Volume Information folder, or have the MP3s in their own folder on the thumb drive. This can happen with any folder, but the System Volume Information folder seems to cause the most issues because it is not always obvious that folder is there since it is usually hidden in Windows.
Fix volume too low: This is more of an issue with the Command Line (Buster) version of Raspberry Pi OS as you can easily adjust the master volume from the menu bar in the GUI version. It can still be useful when troubleshooting sound issues like defining sound cards. If your speaker volume is at 100%, the volume in Fruitbox is 100% and it still sounds too quiet, your Raspberry Pi master volume might need to be adjusted. At the command line, type alsamixer. Within alsaMixer you can define which sound card is used (HDMI, Headphones, etc) and adjust the master volume with the up and down keys on your keyboard. I typically set mine to 100% and just use Fruitbox to adjust the volume.
My Pi5 doesn’t have a 3.5mm audio jack. WTF? Yeah this is pretty lame. Luckily, you can use a usb to 3.5mm adapter or use a DAC hat or HDMI audio, but like, WTF?
I’m getting a gpio mmap error when trying to configure buttons: This is currently an issue with Raspberry Pi5s. The way the GPIO works on Pi5s has changed and you’ll not be able to use the configure buttons menu item until (if) Mike Kingsley compiles a new Pi5 version that addresses this. In the meantime, you can still change buttons the hard way by editing the Fruitbox.ini file. See Fruitbox.ini – Default Buttons – informational in section 9 of this guide.
My fan keeps running after shutting down my Pi4: Unfortunately I’ve not been able to find a fix for this. It appears to mainly effect Pi4s. All I can recommend is to unplug the device after shutting it down. If you’re aware of a fix for this, please let me know.
This guide mentions editing files in the .config folder, but I don’t have that folder: This is a hidden file. Right click in any file manager window and select Show Hidden.
Bonus section
How to install a power button on your Raspberry Pi3 or Pi4
After all the work to get this far, it is highly recommended to install a power button to perform safe shutdowns so you don’t bork your SD card.
To power off your Pi from within Fruitbox, you can use the SysRq key Which on my keyboard is also the PrintScreen key. You can change this key in the menu to any key you want (make sure it’s not already assigned to something else). To start your pi, you’ll need to short pins 5 and 6. It’s easy to wire a momentary switch to those pins. Since Fruitbox can access the GPIO, you can now go back into the menu, configure buttons and go to the power off entry and press enter to change it. Press your power button. If you wired it properly, it should change from SysRq to GPIO-3. Now you can power the Pi off and on with that switch.
In order to power off the pi outside of Fruitbox, you’ll need to edit another file.
From the command line type: sudo nano /boot/config.txt then press enter
At the very bottom of the file type – dtoverlay=gpio-shutdown
Press ctrl-x to exit nano. Select Y and press enter to save.
For the change to work, you’ll need to reboot. Now you should be able to use the power button from the raspberry pi OS desktop.
Note: Raspberry Pi4s have a strange power situation where the GPIO 3.3V AND 5V power stays on even when the Pi has been shutdown, so if you have fans or anything else powered by the GPIO, you might also want to externally switch off the power going in to the Pi4 after safely shutting down. Pi3s don’t seem to have this issue. Pi5s seem to be immune from this as well since they do not use the GPIO for the fan.
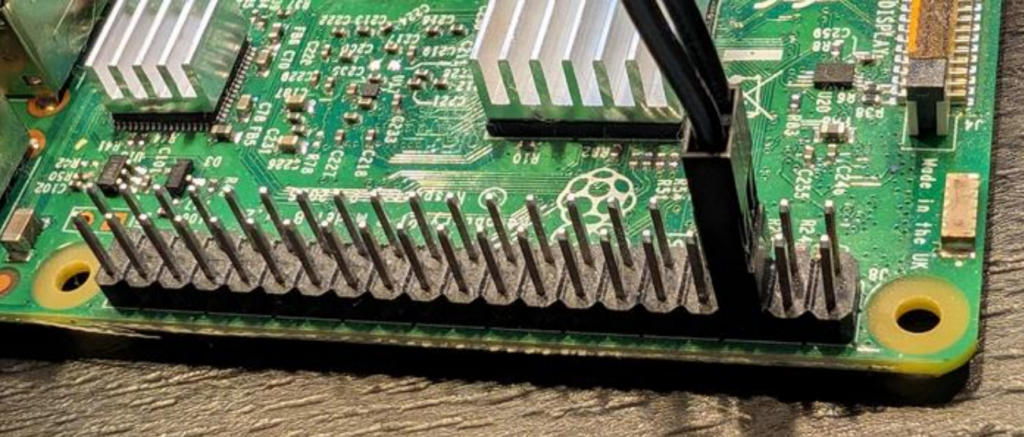
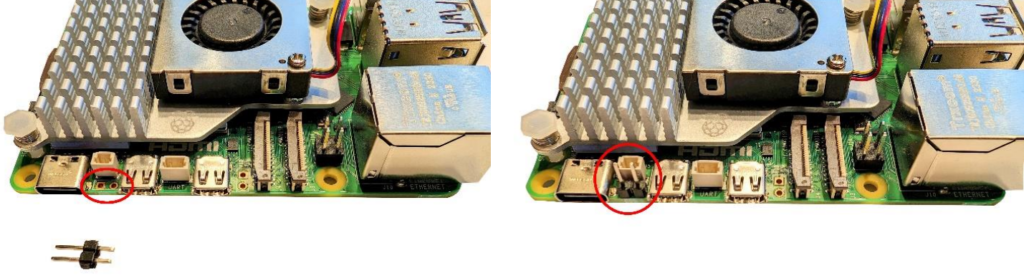
If you’re using a Pi5… The situation with the Pi5 is different than the Pi3 and Pi4. The Pi5 has a dedicated power button. If you want to use your own power button, you can use the holes shown here and solder your own pins to this spot then connect you wires and button to those pins. Why the Pi5 does not ship with pins already soldered on is a mystery to me. If you are using a third party heat sink that covers this spot, you might need to get creative (solder the pins to the underside?). Because the Pi5 has a new GPIO setup that Fruitbox does not recognize, you’ll have to exit Fruitbox before shutting down with this button. The power button seems to have no effect when Fruitbox is running.
Start Fruitbox with a single button press – Bullseye OS.
What is this? This enables a single button press to launch Fruitbox from the desktop. *This is dependent on having the autostart enabled as described in the section titled – RPI Bullseye autostart method [or Bookworm if using the X11 backend].
1. Create a file that waits for a button press: In your /home/pi/fruitbox directory, create a file containing the following text. Name the file fruitbox_startbutton.py. The first line needs to be at the very top of the file. The indentations are critical, they must be spaces not tabs. (4 spaces for single indentation and 8 spaces for the double indentation). You can *probably* cut and paste this into your own files, just make sure the indents are formatted properly as they might lose their formatting if being copied from this page.
#!/usr/bin/env python3

import RPi.GPIO as GPIO
import time
import subprocess

GPIO.setmode(GPIO.BCM)

GPIO.setup(27, GPIO.IN, pull_up_down=GPIO.PUD_UP)

while True:
    input_state = GPIO.input(27)
    time.sleep(0.01)
    if input_state == False:
        import os
        os.system("bash /home/pi/myfruitbox.sh ~")
        # block until finished (depending on application)
2. Edit the autostart file that we created to start Fruitbox automatically in section 6 of this guide: /home/pi/.config/lxsession/LXDE-pi/autostart You can use the nano editor from a terminal or right click the file in the GUI and click text editor.
Add the highlighted line. (If you don’t see the @lxterminal -e bash /home/pi/myfruitbox.sh line, it’s because you haven’t set up autostart yet. Refer to section 6 of this guide to set up autostart). @lxpanel –profile LXDE-pi @pcmanfm –desktop –profile LXDE-pi @xscreensaver -no-splash @lxterminal -e python3 /home/pi/fruitbox/fruitbox_startbutton.py @lxterminal -e bash /home/pi/myfruitbox.sh
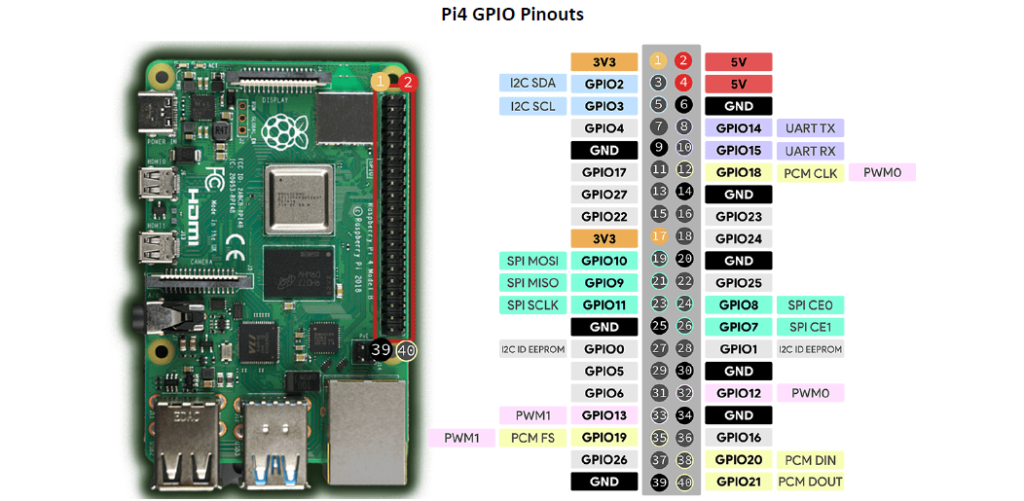
3. Attach/Install your button: Shutdown your machine and attach one of the button wires to a GPIO pin. In this scenario we used GPIO 27 (input_state = GPIO.input(27)) but you could use a different GPIO. Attach the other button wire to the GPIO ground. *Note, GPIO 27 is physical pin# 13. See diagrams for pinouts at the end of the page.
4. Boot your machine: Fruitbox will start as it always did. When you exit Fruitbox you will see an open terminal window. It is used to make this work, don’t close it. Now if you press the button you assigned, Fruitbox should start.
Start Fruitbox with a single button press – Bookworm OS (Wayland backend)
What is this? This enables a single button press to launch Fruitbox from the desktop. * This is dependent on having the autostart enabled as described in the section titled – RPI Bookworm autostart method.
1. Create two files to start program that waits for a button press: You will need to create two files in your /home/pi/fruitbox directory.
a. First file: Name this file fruitbox_startbutton.sh The first line needs to be at the very top of the file.
#!/bin/bash
python3 /home/pi/fruitbox/fruitbox_startbutton.py
b. Second File: Name this file fruitbox_startbutton.py The indentations are critical, they must be spaces not tabs. (4 spaces for indentation) You can cut and paste this into your own files, just make sure the indents are formatted properly as they might lose their formatting.
from gpiozero import Button
from signal import pause
from subprocess import os
btn = Button(27)
while True:
    btn.wait_for_press()
    os.system("/home/pi/fruitbox/./fruitbox")
c. Make both files executable: 1. Open a terminal window 2. Change to /home/pi/fruitbox directory: At the prompt type cd /home/pi/fruitbox (press enter) 3. At the prompt type chmod 755 fruitbox_startbutton.py (press enter) 4. At the prompt type chmod 755 fruitbox_startbutton.sh (press enter)
2. Edit the wayfire.ini that we edited to start Fruitbox automatically. (See the section titled -RPI Bookworm autostart method)
Open a terminal window Type sudo nano /home/pi/.config/wayfire.ini (press enter) At the bottom of the file, add the highlighted line below. (If you don’t see the [autostart] section, it’s because you haven’t set up autostart yet. See the section titled -RPI Bookworm autostart method).
[autostart] fruitboxstartbutton = cd ~/fruitbox && ~/fruitbox/fruitbox_startbutton.sh fruitbox = cd ~/fruitbox && ~/fruitbox/fruitbox
Press ctrl-x to exit nano. Select Y and press enter to save.
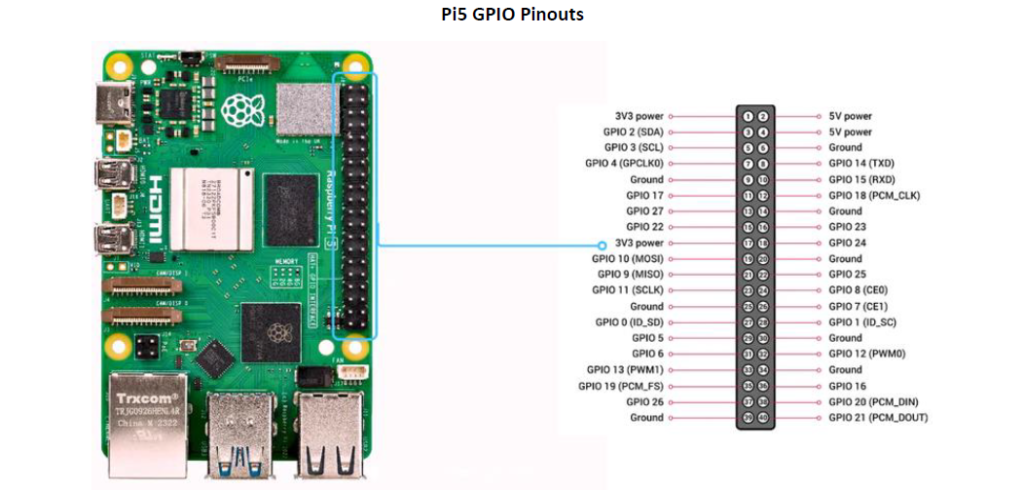
3. Attach/Install your button: Shutdown your machine and attach one of the button wires to a GPIO pin. In this scenario we used GPIO 27, but by changing the number in the above code (btn = Button(27)) you could use a different pin. Attach the other button wire to the GPIO ground. *Note, GPIO 27 is physical pin# 13. See diagrams for pinouts on the last page.
4. Boot your machine: Fruitbox will start as it always did. When you exit Fruitbox and press the button you assigned, Fruitbox should start.
Start Fruitbox with a single button press – Bookworm OS (X11 backend)
What is this? This enables a single button press to launch Fruitbox from the desktop. * This is dependent on having the autostart enabled as described in the section titled – RPI Bullseye autostart method [or Bookworm if using the X11 backend]
1. Create two files to start program that waits for a button press: You will need to create two files in your /home/pi/fruitbox directory. a. First file: Name this file fruitbox_startbutton.sh The first line needs to be at the very top of the file.
#!/bin/bash
python3 /home/pi/fruitbox/fruitbox_startbutton.py
b. Second File: Name this file fruitbox_startbutton.py — The indentations are critical, they must be spaces not tabs. (4 spaces for indentation) You can cut and paste this into your own files, just make sure the indents are formatted properly as they might lose their formatting if being copied from a pdf.
from gpiozero import Button
from subprocess import os
btn = Button(27)
while True:
    btn.wait_for_press()
    os.system("bash /home/pi/myfruitbox.sh ~")
c. Make both files executable 1. Open a terminal window 2. Change to /home/pi/fruitbox directory. At the prompt type cd /home/pi/fruitbox (press enter) 3. At the prompt type chmod 755 fruitbox_startbutton.py (press enter) 4. At the prompt type chmod 755 fruitbox_startbutton.sh (press enter) 2. Edit the autostart file that we created to start Fruitbox automatically. /home/pi/.config/lxsession/LXDE-pi/autostart Add the highlighted line. (If you don’t see the @lxterminal -e bash /home/pi/myfruitbox.sh line, it’s because you haven’t set up autostart yet. Refer to section titled – RPI Bullseye autostart method [or Bookworm if using the X11 backend]).
@lxpanel --profile LXDE-pi
@pcmanfm --desktop --profile LXDE-pi
@xscreensaver -no-splash
@lxterminal -e python3 /home/pi/fruitbox/fruitbox_startbutton.py @lxterminal -e bash /home/pi/myfruitbox.sh
Save the file.
3. Attach/Install your button: Shutdown your machine and attach one of the button wires to a GPIO pin. In this scenario we used GPIO 27, but by changing the number in the above code (btn = Button(27)) you could use a different pin. Attach the other button wire to the GPIO ground. *Note, GPIO 27 is physical pin# 13. See diagrams for pinouts on the last page.
4. Boot your machine: Fruitbox will start as it always did. When you exit Fruitbox you will see an open terminal window, it is used to make this work, don’t close it. Now if you press the button you assigned, Fruitbox should start.
Start Fruitbox from a shortcut on your desktop (helpful for touchscreens)
If you are setting this up for touchscreen, please note – you’ll initially need a keyboard and mouse to create the bash file and do some clicking on the desktop.
1 Right click on the desktop and select ‘New file’.
2 Enter a name for the new file – fruitbox.sh or whatever you want it to be named. Make sure it has the .sh extension. Click OK.
3 Open this new (empty) file in a text editor.
4 Paste the following script into the editor.
!/bin/bash
cd ~/fruitbox && ~/fruitbox/fruitbox
5 Make sure the shebang/hashbang at the top is correct with no leading or trailing spaces and mind the spaces in the second line, it should be cd(space)~/fruitbox(space)&&(space)~/fruitbox/fruitbox)
6 Save the file from the editor.
7 Right click the icon on the desktop and choose ‘Properties’.
8 In ‘Properties’, ignore ‘General’ tab and go to the ‘Permissions’ tab.
9 In Access Control make these settings as needed. I use these: View Content: Only Owner Change Content: Only Owner Execute: Only owner
10 Click OK. You should now be able to double click that file and a box will open asking if you want to execute file. Click the execute button. Fruitbox should launch.
To remove the “execute this file” dialog nag, open the file below (you might need to ensure ‘show hidden‘ is enabled as the .config folder is hidden by default)> /home/pi/.config/libfm/libfm.conf Find the line quick_exec=0 and change it to quick_exec=1 Save the file and reboot the pi. Now fruitbox should launch by double clicking that bash file on the desktop without getting the execute file dialog.
If you are using a touchscreen, Open File Manager and go to “Edit>Preferences” Put a check in “Open files with single click”. This will remove the double tap requirement making it easy to launch with a single touch of the icon.
Changes from previous version of this guide
Added a rant to the How to use this guide – Please read section.
Added – ‘Fruitbox will not run – error while loading shared libraries: libbcm_host.so.0: cannot open shared object file: No such file or directory’ – in Troubleshooting: Common Issues and Fixes section.
Latest skins added in Fruitbox.ini – Enabling the Skin Chooser section
Added – ‘Using a touchscreen and there is no onscreen exit button’ – in Troubleshooting: Common Issues and Fixes section.
Any other minor changes noted in green highlights.
Acknowledgments
Special thanks to Mickey Knox, Larry Peterson, Laverne Krahenbil, Colin King, Brian Dermody, and the creator of Fruitbox himself, Mike Kingsley.
If this guide has helped you, send me a shout out on Discord or Facebook. For further jukebox discussion (not limited to just Fruitbox), you are invited to join my Discord channel. https://discord.gg/sK6hm3rvKu For custom Jukebox talk in general, check out the Digital Jukebox Builder’s Group on Facebook.
You can find several of my Fruitbox videos on Youtube. https://www.youtube.com/playlist?list=PLSQcYtZXEcntg_lFJrphqnNOB7I_407oT
Diagrams
Past guide revisions
Fruitbox V2 for Raspberry Pi4 and Pi5 rev 2.1 Fruitbox V2 for Raspberry Pi4 and Pi5 rev 2.0 Fruitbox V2 for Raspberry Pi4 and Pi5 rev 1.9 Older PDF guides
DISCLAIMER
This guide is not gospel. If you are not good at this kind of stuff, assume you might need to start over – including re-imaging your SD card. This guide is intended to be used on a fresh Raspberry Pi installation and sticking with the defaults (User pi) and file locations specified in the instructions. If you can’t get something to work, make sure you double check the commands for proper spaces, dashes, underscores, etc. Please note: if you go off the script at all, don’t expect this guide to work. Once you get everything installed – then feel free to make your customizations.
I’ve given you a lot of tools here to install Fruitbox on your own. If you have questions, feel free to ask over on my discord (link is above). Having a hissy fit or saying you are going to smash your Raspberry Pi with a hammer because you can’t figure it out will get you nowhere.