
Version 1.0 By Colin King
Introduction
Fruitbox is an amazing piece of software and is fully customisable
It may appear daunting at first but it is really fairly straight forward to design your own skins, even easier to edit or adapt an existing skin to suit your needs.
I am by no means an expert on fruitbox,I am an enthusiastic user and possibly an intermediate user. Most of this guide is from my own experiences with a few hints and tips gleaned from other users and responses to questions posed to the creator Mike Kingsley.
This is not meant to be a definitive guide but should be considered a companion document to be used alongside the Official Users Guide. Hopefully it will encourage you to give creating your own skin a go – and if you do build your own skin then please share it with the fruitbox community !
Colin King January 2024
The Skin Configuration File
The cornerstone of fruitbox is the configuration file fruitbox.cfg.
Fruitbox.cfg is found in the skin folder along with image files, sound files and text files. The .cfg file is a human readable .txt file that defines and links all these various files to provide the fruitbox interface.
When first looking at how skins are put together I noticed a lot of skins have files such as Foreground.png, Background.jpg etc. However it became apparent that fruitbox has absolutely no understanding of the terms foreground or background they are simply filenames they could be bananas and apples as far as fruitbox is concerned.
Configuration files (skins) define the look and feel of fruitbox. A configuration file is a human-readable text file containing a list of parameters and their values.
Parameters are grouped into sections, where each section is defined by its name enclosed in square brackets eg [bitmap], [status], [spectrum], a ‘header’ if you will. Each section ‘header’ is followed by the parameter list for that section. A parameter is defined by specifying its name, followed by its parameter value(s). (See the user guide for full details) Note: If a parameter is not specified in the configuration file, fruitbox will use a default value.
The order of these sections within the .cfg file is not important except when the section refers to a display object, in which case the order of the sections determines the physical order in which they are rendered to the display. Because fruitbox renders objects ie image files to the screen in the order they appear in the .cfg file it gives you the ability to build the screen in layers some of which will have transparent areas to act as ‘windows’ to the layers beneath. Knowing this simple fact is key in achieving the viewed end result.
Comments can be included in the configuration file by prefixing any comment text with the hash ‘#’ character. This is useful for adding notes to your .cfg file.
Status Boxes
Status boxes provide a very flexible way of displaying real-time text-based information, fixed and animated bitmaps, video clips and sound effects.
Examples of status include ‘Now Playing’ information, ‘Coming Up’ song list, Select Code, Credits, etc.
It will be seen that a [status] typically comprises of three main items:
- The defined {status] entry in the .cfg file
- An assosciated ‘contents’ file
- An assosciated object (graphic, sound, video etc)
The contents file is a simple txt file that contains human readable text which indicates what is written, drawn or played in the status box.
As well as fixed text, the user can also use predefined variables, which represent song details and jukebox status, and also enable text and bitmaps to be conditionally drawn under many different circumstances.
Status boxes can also be used to allow GPIO pins to be driven with high or low values under different fruitbox conditions.
Over the following pages you can view an overview of the configuration file for a skin an existing skin (SB-M1100).
In the left column is the actual .cfg file listing, in the right column is a breakdown and description of the parameters being called.
After the above overview we move onto Planning and designing a new skin, followed by ‘Lets Build This’ section – these parts are best followed with the actual example skin being built ‘SmallSage’ available from the fruitbox Git Hub if not already pre-loaded in your fruitbox download.
https://github.com/chundermike/rpi-fruitbox-v2
SB-M100 Skin and fruitbox.cfg file

Understanding The Configuration File (fruitbox.cfg)
The configuration file is the key document in fruitbox.
Here is a breakdown of the fruitbox.cfg file for the SB-M100 skin and descriptions of its various parts
| Actual .cfg file entry | Notes |
| [general] SkinName = SB-M100 SkinDescription = by Keefypee SkinSize = 1920 1080 | Skin Name Skin size in pixels |
| SortSongsBy = Title SortSongsBy = Artist | You can sort songs alphabetically for the following database fields : Title, Artist, Album, AlbumArtist, Year, Genre, TrackNumber, Publisher, ISRC, Custom Tag, Random, Unsorted. You can sort multiple times eg: SortSongsBy = AlbumArtist SortSongsBy = Album SortSongsBy = TrackNumber |
| SelectButtons = ABCD SelectButtons = 12345678 | These are the actual buttons the skin will use (your jukebox may have more but they will be inactive with this particular skin) In this instance it will produce the codes A1, A2, A3, A4, A5, B1, B2, … E8 |
| SelectButtonsSequence = RowCol | ColRow : SelectButton sequences are cycled in order they are defined RowCol : SelectButton sequences are cycled in reverse order they are defined |
| AutoSelect = yes | The song is selected immediately on entering the select code. If set to ‘No’ you will need to hit the ‘select’ button to play the song |
| SelectTimeout = 4 seconds | Timeout for select code to return to undefined after not detecting all the selection digits |
| SelectHoldTimeout = 2 seconds | Timeout for select code to return to undefined after song selected |
| SongsPerTitleStrip = 2 | Number of song entries on each song title strip |
| TitleStripAutoTurnTime = 1 minute | Time between title_strips automatically turning (0 = no automatic title strip turn) |
| TitleStripSize = 374 100 | Size of each title strip in pixels |
| TitleStripBackground = page_bkgndred.jpg #TitleStripBackground = page_bkgndgreen.jpg Rock #TitleStripBackground = page_bkgndblue.jpg Pop | Filename of graphic image (bmp, png, tga, jpg, pcx) to be used as the title strip background. Optional Genre string is name of genre specific title strip background so you could have different colour title strips for each genre defined |
| TitleStripMoveStyle = 12 5 yes | The style of animation of the title strip <speed> <effect> <fade> <speed> 1..x = higher number = faster title strip turn (0 = instant) <effect> 0 = swipe horizontally 1 = swipe vertically 2 = reveal horizontally 3 = reveal vertically 4 = turn horizontally 5 = turn vertically 6 = dissolve <fade> no = title strips don’t fade yes = title strips fade to black |
| PairSongs = Dual | No – each song in a title strip is listed with its artist line Yes – two songs are displayed (above and below) the artist line only if they are by the same artist Dual – two songs are displayed (above and below) the artist line regardless of artist (both artists will appear on artist line which may be crowded on smaller screens) |
| SongText = 1 0 0 0 255 center false -1 false 0 4 330 | Text style for Song Title in title strip <font> <colour (r g b a)> <alignment> <capitalise> <mode> <quoted> <offset (x y)> <max_width> See section ‘Fonts and Text’ in user guide for more details |
| ArtistDescription = ${SONG_ARTIST} / ${PAIRED_SONG_ARTIST} | Defining the artist description in the title_strips |
| ArtistText = 1 0 0 0 255 centre true -1 false 0 4 250 | Text style for Artist Name <font> <colour (r g b a)> <alignment> <capitalise> <mode> <quoted> <offset (x y)> <max_width> See section ‘Fonts and Text’ in user guide for more details |
| ExtraDescription = ${GENRE} | Defining the extra description in the title_strips (same values as ‘SongDescription’) Note that each entry must have a corresponding “ExtraText” entry (see below) |
| ExtraText = 4 32 32 32 200 right false -1 false -8 4 330 | Text style for the extra text field(s) in song title strip ExtraText * <font> <colour (r g b a)> <alignment> <capitalise> <mode> <quoted> <offset (x y)> <max_width> Note that this must be defined for each definition of “ExtraDescription” |
| ExtraDescription = ${PAIRED_GENRE} | As Above |
| ExtraText = 4 32 32 32 200 right false -1 false -8 80 330 | As Above |
| SongLoadTime = 7.5 seconds | The time the song takes to load (from removing from the coming up queue to starting to play) |
| SongUnloadTime = 7 seconds | The time the song takes to unload (from finishing playing to the next song in the queue loading) |
| [status] Contents = coin_insert_sound.txt Sound = coin-insert.wav 90 | A Status typically has three parts: This Status which defines the other two items: Contents – An assosciated txt file which will instruct fruitbox when and what to do. An assosciated file (Bitmap, Sound, Video, text etc) In this case the Status will play the sound of a coin being inserted. The number following a defined audio file is the volume level it will be played at |
| [status] Contents = select_song_sound.txt Sound = JBBPress.wav 100 | As Above |
| [status] Contents = load_song_sound.txt Sound = mech-only2.wav 90 | As Above |
| [status] Contents = unload_song_sound.txt Sound = mech-only-rev.wav 90 | As Above |
| [status] Contents = invalid_song_sound.txt Sound = invalid.wav 100 | As Above |
| [fonts] File = courierb.ttf 25 File = dvsansb.ttf 19 File = hatten.ttf 50 File = courier.ttf 16 | Lists the fonts and sizes to be added to the fontpool <file><height> (ttf, opentype, type1, CID, CFF, fon, fnt, x11, pcf) Note that the order in which the fonts are defined in the [fonts] section determines their font number, starting at 1. (Font number 0 is the internal fruitbox font used for the on-screen menus etc) |
| [bitmap] File = lighting.jpg Position = 346 700 Size = 1228 360 Tint = 32 [255 ${SPECTRUM_BAND} 0] 32 [255 ${SPECTRUM_BAND} 0] 32 [255 ${SPECTRUM_BAND} 0] 255 | This is the background behind the spinning record |
| [status] Position = 346 880 [700 ${SONG_LOAD_POSITION}] Size = 1228 360 Bitmap = record_spin01.png Bitmap = record_spin02.png Bitmap = record_spin03.png Bitmap = record_spin04.png Bitmap = record_spin05.png Bitmap = record_spin06.png Bitmap = record_spin07.png Bitmap = record_spin08.png Bitmap = record_spin09.png Bitmap = record_spin10.png Bitmap = record_spin11.png Bitmap = record_spin12.png Bitmap = record_spin13.png Bitmap = record_spin14.png Bitmap = record_spin15.png Bitmap = record_spin16.png Contents = record_spin.txt TimerTickPeriod = 1 | A status to display a ‘video’ animation of a spinning record at a defined size and position. As can be readily seen the ‘video’ is actually a series of images displayed at a defined speed (TimerTickPeriod) |
| [bitmap] File = pickup.png Position = 510 180 [380 ${SONG_LOAD_POSITION}] Size = 440 500 Angle = -5 [-60 ${NOW_PLAYING_ELAPSED_TIME}] | An image of a tone arm with dynamic parameters which will ‘move’ the tone arm from its song load position to its maximum position as governed by the elapsed time. The format of the dynamic value field is “[max_value mode <param>]”. Note the square brackets must be specified in order for the dynamic values to be recognised. The parameter value will change between the initial value and the ‘max_value’. |
| [title strip] Position = 50 112 Angle = 359 Movedelay = 10 MoveReverse = no | Defines where the title strip will be positioned and how it will be displayed. Position in pixels Angle (0 – 360 degrees) MoveDelay = Delay (in video frame ticks) between left/right button press and the title strip physically moving MoveReverse = Yes/No Reverse the direction of the title strip movement |
| [title strip] Position = 50 230 Angle = 0 Movedelay = 4 MoveReverse = no | By varying the Angle and MoveDelay and MoveReversein different title strips can give the illusion of title strips ‘tumbling’ in a more convincing mechanical jukebox effect rather than perfect ‘digital’ movement. |
| [title strip] Position = 50 348 Angle = 0 Movedelay = 5 MoveReverse = no | As Above |
| [title strip] Position = 554 112 Angle = 0 Movedelay = 7 MoveReverse = yes | As Above and similar for all other title strips defined in the .cfg file |
| [bitmap] File = foreground.png Position = 0 0 Size = 1920 1080 Tint = 255 255 255 255 | A defined image at a defined size and position, in this case full screen Fruitbox doesn’t understand the terms foreground and background. Objects are drawn to the screen in the order they are defined in the .cfg file. Hence the preceeding title strips are drawn before this ‘foreground’ image is drawn / ‘laid’ on top. Tint modifies the objects colour Tint <red> <green> <blue> <alpha> |
| [status] Contents = stereo.txt Position = 864 930 Size = 200 26 Bitmap = stereo_red.png Tint = 200 [255 ${RANDOM}] 255 255 255 | Status to display (draw) an image at the defined location whenever a stereo song is detected. The image Tint will vary randomly between an RGB value of 200 and 255giving the illusion of an incandesant lamp |
| [spectrum] Position = 120 750 Size = 318 222 HorizontalFlip = yes Tint = 80 80 80 255 Band = 0 1.0 0 0 Band = 1 1.0 0 0 Band = 2 1.0 0 0 Band = 3 1.0 0 0 Band = 4 1.0 0 0 Band = 5 1.0 0 0 Band = 6 1.0 0 0 Band = 7 1.0 0 0 Band = 8 1.0 0 0 Band = 9 1.0 0 0 Band = 10 1.0 0 0 Band = 11 1.0 0 0 Band = 12 1.0 0 0 Band = 13 1.0 0 0 Band = 14 1.0 0 0 Band = 15 1.0 0 0 Band = 16 1.0 0 0 Band = 17 1.0 0 0 Band = 18 1.0 0 0 Band = 19 1.0 0 0 Bitmap = spectrum.png Mode = scaled Channel = left Decay = 2 | A [spectrum] object allows an audio frequency spectrum to be displayed for the mp3 songs. Multiple [spectrum] objects can be defined. Various options allow great flexibility in the visual appearance. For example, the user has control over the look of each of the 32 possible frquency bands, and which are visible. The position is the position prior to flipping Band = <number (0 thru 31)> [gain (1.0 nominal)] [offset (x y)] [tint (r g b a)] Note: the tint is applied in addition to the global [spectrum] Tint Bitmap is the defined graphic used to display each band Mode specifies how the graphic is drawn using the audio values. It can be either scaled, clipped or position: Scaled – the graphic is drawn fully, but sized to the appropriate height Clipped – The graphic is not scaled, but cut off at the audio value height Position – The graphic is drawn full size, but the audio value determines its vertical position Channel can be Left, Right or Both Decay <value> the speed of peak Decay – time (0=instant) |
| [spectrum] Position = 120 750 Size = 318 222 Tint = 255 255 255 255 Band = 0 1.0 0 0 Band = 1 1.0 0 0 Band = 2 1.0 0 0 Band = 3 1.0 0 0 Band = 4 1.0 0 0 Band = 5 1.0 0 0 Band = 6 1.0 0 0 Band = 7 1.0 0 0 Band = 8 1.0 0 0 Band = 9 1.0 0 0 Band = 10 1.0 0 0 Band = 11 1.0 0 0 Band = 12 1.0 0 0 Band = 13 1.0 0 0 Band = 14 1.0 0 0 Band = 15 1.0 0 0 Band = 16 1.0 0 0 Band = 17 1.0 0 0 Band = 18 1.0 0 0 Band= 19 1.0 0 0 Bitmap = spectrum.png Mode = scaled Channel = right Decay = 2 | As Above |
| [status] Position = 116 750 Size = 314 222 Text = 2 255 0 0 255 center false 1 false 0 0 300 Contents = now_playing.txt TimerTickPeriod = 4 linespacing = 1 | A Status Box at a defined position and size displaying info on the song currently being played Displaying text using font number 2 (dvsansb.ttf 19) from the text pool see [fonts] above <font> <colour> <alignment> <capitalise> <mode> <quoted> <offset (x y)> <max_width> the text colour is 255 0 0 255, the text is centre aligned, not capitalised, text is scrolled at the specified speed (1 = slowest) if it doesn’t fit into max_width, text is not quoted, no offsets for positioning, and a maximum width of 300 characters Linespacing (gap) in pixels |
| [status] Position = 1500 812 Size = 310 148 Text = 2 255 0 0 255 center false -1 false 0 0 300 Contents = coming_up.txt LineSpacing = 1 | A Status box at a defined position and size displaying text of songs coming up |
| [status] Position = 1480 746 Size = 190 160 Text = 3 255 0 0 255 center false 0 false 0 0 160 Contents = selection.txt | A status box at a defined position and size displaying the song selection using font 3 (hatten.ttf 50) |
| [status] Position = 1660 746 Size = 190 160 Text = 3 255 0 0 255 center false 0 false 0 0 160 Contents = credits.txt TimerTickPeriod = 150 | A Status box at a defined position and size displaying “Freeplay” or the number of credits available |
Building A New Skin
Planning A New Skin
Consider what it is you want the skin to look like, what information and how you want it displayed.
In this example :
- I want a skin for a small 10.1” display
- I want a clean and simple look
- I want the title strips to :
- roll up / down in synch
- I want to display:
- Selection made
- Now Playing info
- Coming Up info
- I want status messages for:
- User Select Mode / Autoplay Mode
- Invalid Selection
- Duplicate Selection
- Play Paused
- Play Muted
- I want a graphic image for:
- Play Paused
- Play Mute
- I want a sound effect for:
- Title Strip movement
- Invalid Selection
- Duplicate Selection
- I want the 12 title strips to show a single artist and song unless both songs are by the same artist
- (This should help keep it clean uncluttered by the increase in ‘white space’)
Design Time
Fire up your art package of choice – I run Corel Paintshop Pro X9 (2016) it maybe a little outdated but its still got more features than I’m ever likely to use.
I am making the huge assumption you know how to use your chosen software of choice as this is a guide for fruitbox skinning not a Photoshop masterclass.
Because this skin is for use on a smaller display I created a new image with a size of 1280 x 720 pixels with a resolution of 72 pixels per cm and a transparent background.
Normally most fruitbox skins are 1920 x 1080. Fruitbox will rescale the skin to fit the display in use but its perhaps best practice to keep the size relative to the display.
Pick out your colour and flood fill the image – I went for a nice Sage green, hence the name SmallSage.
We now need to ‘cut’ holes for the title strips to show through to the transparent background – this will let the title strips show through from underneath. To do so we need to know what size title strip we are using so it’s a bit of a chicken and egg situation as to what you want to do first. There are different ways of doing this depending on your software of choice, ability etc. but basically you make the title strip a few pixels bigger than the hole so that you don’t end up with any black ‘dead’ areas or lines showing.
Most art packages include tools for sizing ‘objects’ such as rectangles and have other tools like Align and Distribution to make life easier planning on the placement of title strips on your workspace. There are also online resources that may help like this one – Smaller Rectangles Within A Larger Rectangle
It is quite usual to have the status boxes cut-out to the transparency too like small windows for the status message displays. However, in this case I want to print the Now Playing and coming up info printed onto areas that match the title strips and the status messages to be printed onto the same sage green background to ensure a clean uncluttered look, less is more as they say.
This is the title strip (size 400 x 112pixels)

So, this is what my ‘foreground’ image looks like – remember, fruitbox doesn’t understand the terms foreground or background they are just convenient names of images. The transparent (chequered) are where the title strips will be positioned/drawn by fruitbox BEFORE drawing the foreground over the top effectively masking any overlap.

The status box for things like ‘User Select Mode’, ‘Autoplay Mode’, ‘Duplicate Selection’, ‘Invalid Selection’ and ‘Select Code’ is to be defined as the area in between the ‘Now Playing’ and ‘Coming Up’ areas.
Once you have an image your happy with grab a pen and a notepad as you will need to ‘map’ certain areas of your image to tell fruitbox what and where the areas are.
So, with the image loaded in your art package you can zoom in to 100% or more to accurately measure each of the top left corners of the title strip ‘holes’ and its size (both in pixels) the ‘Now Playing’ status box, the ‘Coming Up’ status box and the area where you want to place status messages.
Most art packages have a cross hair cursor and co-ordinates easily found. Hopefully as we go through the .cfg file it will all start making sense !
Let’s Build This !
OK, armed with our image files – foreground and title strip, any sound effect files you want to use we can assemble the whole jukebox interface using nothing more than than a humble text editor – good old Notepad if you’re a PC kind of guy.
So boot up Notepad and create a file fruitbox.cfg (or cheat and edit an existing .cfg file from another skin, its what we all do) and start entering the info:
Refer back to the SB-M100 skin config file as and when you you need to !
Note: When editing the configuration file you can use the hash ‘#’ to make notes as fruitbox will ignore anything on that line after the #
| SkinName = SmallSage | |
| SkinDescription = by Colin King | |
| SkinSize = 1280 720 | |
| SortSongsBy Title | |
| SortSongsBy Artist | |
| SelectButtons = ABC | |
| SelectButtons = 12345678 | |
| AutoSelect = Yes | |
| SelectTimeout = 3 sec | |
| SelectHoldTimeout = 3 sec | |
| NoDuplicates = yes | |
| # TITLE STRIPS | |
| TitleStripAutoTurnTime = 1 minute | |
| SongsPerTitleStrip = 2 | |
| TitleStripSize = 400 112 | Make sure you change this to your title strip size |
| TitleStripBackground = title_strip.png | Make sure you change this to your title strip image name |
| PairSongs = yes | |
| SongDescription = ${SONG_TITLE} | |
| ArtistDescription = ${SONG_ARTIST} | |
| TitleStripMoveStyle = 15 5 no | |
| SongLoadTime = 0.5 sec | |
| SongUnloadTime = 0 | |
| ArtistText = 2 185 50 55 220 centre true -1 false 0 8 170 | You may need to revisit these to fine tune position of text in title strips |
| SongText = 1 50 40 45 200 centre true -1 false 0 8 239 | as above |
| PairedSongText = 1 50 40 55 200 centre true -1 false 0 0 239 | As above |
| [fonts] | |
| File = TCB_____.TTF 27 File = TCB_____.TTF 25 File = TCB_____.TTF 35 | |
| # TITLE STRIPS COLUMN #1 | |
| [title strip] Position = 25 160 Movedelay = 0 | Make sure the positions match those of your image |
| [title strip] Position = 25 287 Movedelay = 0 | Make sure the positions match those of your image |
| [title strip] Position = 25 416 Movedelay = 0 | Make sure the positions match those of your image |
| [title strip] Position = 25 543 Movedelay = 0 | Make sure the positions match those of your image |
| # TITLE STRIPS COLUMN #2 | |
| [title strip] Position = 446 159 Movedelay = 0 | Make sure the positions match those of your image |
| [title strip] Position = 446 287 Movedelay = 0 | Make sure the positions match those of your image |
| [title strip] Position = 446 417 Movedelay = 0 | Make sure the positions match those of your image |
| [title strip] Position = 446 543 Movedelay = 0 | Make sure the positions match those of your image |
| # TITLE STRIPS COLUMN #3 | Make sure the positions match those of your image |
| [title strip] Position = 866 159 Movedelay = 0 | |
| [title strip] Position = 866 287 Movedelay = 0 | Make sure the positions match those of your image |
| [title strip] Position = 866 415 Movedelay = 0 | Make sure the positions match those of your image |
| [title strip] Position = 866 543 Movedelay = 0 | Make sure the positions match those of your image |
| [bitmap] File = foreground.png Position = 0 0 Size = 1280 720 | The image of the foreground – Remember fruitbox doesn’t recognise terms like foreground and background. Its just a filename. What is important is that it is positioned after the title strip images to display correctly on screen |
| [status] # Page turn sound Contents = page_turn.txt Sound = pagemove.wav 80 | The contents of page_turn_txt: ${IF_TITLE_STRIP_MOVING}${IF_NOT_SONG_PLAYING}${PLAY_SOUND} |
| [status] # PAUSE Position = 0 0 Size = 1280 720 Bitmap = paused-text.png Contents = pause_pressed.txt | The contents of Pause_pressed.txt: ${IF_PAUSED}${DRAW_BITMAP} ${IF_NOT_PAUSED}${UNDRAW_BITMAP} |
| [status] # MUTE Position = 0 0 Size = 1280 720 Bitmap = muted-text.png Contents = mute_pressed.txt | contents of mute_pressed.txt: ${IF_MUTE}${DRAW_BITMAP} ${IF_NOT_MUTE}${UNDRAW_BITMAP} |
| [status] # NOW PLAYING Position = 17 43 Size = 483 89 Text = 1 50 40 45 200 centre true -1 false 0 8 239 Contents = status_nowplaying.txt | contents of status_nowplaying.txt: ${IF_PAUSED}JUKEBOX IS${ELSE}${IF_NOT_PAUSED}${IF_MUTE}JUKEBOX IS${ELSE}${IF_NOT_MUTE}${IF_SONG_PLAYING}${NOW_PLAYING_TITLE}${ELSE}${IF_NOT_SONG_ PLAYING}${IF_NOT_ATTRACT_MODE} USER SELECT MODE ${ELSE}${IF_NOT_FREEPLAY}${IF_NO_CREDITS}INSERT COIN - SELECT LETTER THEN NUMBER${ELSE}${IF_ANY_CREDITS}${CREDITS} CREDITS - SELECT LETTER THEN NUMBER${END_IF} ${IF_PAUSED}PAUSED${ELSE}${IF_NOT_PAUSED}${IF_MUTE}MUTED${ELSE}${IF_NOT_MUTE}${IF _SONG_PLAYING}${NOW_PLAYING_ARTIST}${ELSE}${IF_NOT_SONG_PLAYING}${IF_NOT_ATTRAC T_MODE}SELECT LETTER AND NUMBER ${IF_SONG_PLAYING}${NOW_PLAYING_ELAPSED_TIME} ${NOW_PLAYING_LENGTH} |
| [status] # COMING UP Position = 767 43 Size = 483 899 Text = 1 50 40 45 200 centre true -1 false 0 8 239 Contents = status_comingup.txt | contents of status_comingup.txt: ${IF_ANY_COMING_UP}${COMING_UP_TITLE}${ELSE}${IF_NOT_ATTRACT_MODE}USER SELECT MODE${ELSE}AUTOPLAY MODE${IF_ANY_COMING_UP}${COMING_UP_ARTIST}${ELSE}${IF_NOT_ATTRACT_MODE}SELECT LETTER AND NUMBER${ELSE}(SONGS ARE STILL SELECTABLE) ${IF_ANY_COMING_UP}${COMING_UP_NUM_SONGS} Tracks - ${COMING_UP_TOTAL_TIME} |
| [status] # CURRENT MODE Position = 501 43 Size = 264 62 Text = 2 214 214 214 200 centre true -1 false 0 8 239 Contents = status_current_mode.txt Sound = Uh-Uh.wav 40 | contents of status_current_mode.txt: ${IF_PAUSED}JUKEBOX IS${ELSE}${IF_NOT_PAUSED}${IF_MUTE}JUKEBOX IS${ELSE}${IF_NOT_MUTE}${IF_PLAYQUEUE_FULL}PLAYQUEUE${ELSE}${IF_DUPLICATE_CHOICE}D UPLICATE SELECTION${ELSE}${IF_INVALID_CHOICE}INVALID SELECTION${ELSE}${IF_NOT_ATTRACT_MODE}USER SELECT MODE${ELSE}AUTOPLAY MODE ${IF_PAUSED}PAUSED${ELSE}${IF_NOT_PAUSED}${IF_MUTE}MUTED${ELSE}${IF_NOT_MUTE}${IF _PLAYQUEUE_FULL}FULL${ELSE}${IF_DUPLICATE_CHOICE}SONG NOT ADDED ${IF_DUPLICATE_CHOICE}${PLAY_SOUND} ${IF_INVALID_CHOICE}${PLAY_SOUND} |
| [status] # Select CODE Position = 501 107 Size = 260 48 Text = 3 214 214 214 214 centre true 0 false 0 0 46 Contents = status_select.txt | contents of status_select.txt: ${SELECT_CODE} |
| [spectrum] Visible = yes Position = 280 605 S ize = 350 100 HorizontalFlip = yes Tint = 218 216 211 Band = 0 0.8 0 0 Band = 1 0.9 0 0 Band = 2 1.0 0 0 Band = 3 1.0 0 0 Band = 4 1.0 0 0 Band = 5 1.0 0 0 Band = 6 1.0 0 0 Band = 7 1.0 0 0 Band = 8 1.0 0 0 Band = 9 1.0 0 0 Band = 10 1.0 0 0 Band = 11 1.0 0 0 Band = 12 1.0 0 0 Band = 13 1.0 0 0 Band = 14 1.0 0 0 Band = 15 1.0 0 0 Band = 16 1.0 0 0 Band = 17 1.0 0 0 Band = 18 1.0 0 0 Band = 19 1.0 0 0 Bitmap = spectrum.png Mode = clipped Channel = left Decay = 4 | See the following section ‘Spectrum Analyzer’ |
| [spectrum] Position = 630 605 Size = 350 100 Tint = 218 216 211 Band = 0 0.8 0 0 Band = 1 0.9 0 0 Band = 2 1.0 0 0 Band = 3 1.0 0 0 Band = 4 1.0 0 0 Band = 5 1.0 0 0 Band = 6 1.0 0 0 Band = 7 1.0 0 0 Band = 8 1.0 0 0 Band = 9 1.0 0 0 Band = 10 1.0 0 0 Band = 11 1.0 0 0 Band = 12 1.0 0 0 Band = 13 1.0 0 0 Band = 14 1.0 0 0 Band = 15 1.0 0 0 Band = 16 1.0 0 0 Band = 17 1.0 0 0 Band = 18 1.0 0 0 Band = 19 1.0 0 0 Bitmap = spectrum.png Mode = scaled Channel = right Decay = 4 | See the following section ‘Spectrum Analyzer’ |
And here it is, the finished skin

Spectrum Analyzer
A [spectrum] object allows an audio frequency spectrum to be displayed for the mp3 songs (Note: does not work for ogv videos)
Multiple [spectrum] objects can be defined, for most skins two would be defined to show Left and Right channels.
Various options exist to allow great flexibility in the visual appearance of the spectrum analyser.
For example, the user has control over the look of each of the 32 possible frquency bands, and which are visible.
The options within the .cfg file are:
- Visible <yes|no>
- Makes the object visible or invisible
- Size <width> [dynamic] <height> [dynamic] (in pixels)
- Position <x> [dynamic] <y> [dynamic] (in pixels)
- Clip <x> [dynamic] <y> [dynamic] <width> [dynamic] <height> [dynamic] (in pixels)
- Angle <angle>
- [dynamic] of object in degrees (0..359)
- Tint – <r> [dynamic] <g> [dynamic] <b> [dynamic] <a> [dynamic]
- Modify the objects colour
- DynamicEnableFlag <1..4>
- Enable dynamic parameters using status flag 1..4
- HorizontalFlip <yes|no>
- Flip object horizontally
- useful for making left and right audio channel bars appear as a ‘valley’ or a ‘mountain’
- Flip object horizontally
- VerticalFlip <yes|no>
- Flip object vertically
- ideal for a Batcave skin with audio stalagtites pulsing down ??
- or one flipped and one not pulsing into a rectangle
- Flip object vertically
- Bitmap <filename> of band(s) graphic image (bmp, png, tga, jpg, pcx)
- Band * <number (0..31)> [gain (1.0 nominal)] [offset (x y)] [tint (r g b a)]
- Mode <position, scaled, clipped>
Obviously there is no need to itemise all the above parameters in the [spectrum] tab of the configuration file just the particular parameters you are calling.
Example (Classic Skin)

|
[spectrum] # LEFT ANALYSER BARS Bitmap = spectrum.png Mode = scaled Position = 104 284 Size = 160 370 HorizontalFlip = yes Decay = 3 Channel = left Band = 0 1.0 0 0 Band = 2 1.0 0 0 Band = 4 1.0 0 0 Band = 6 1.0 0 0 Band = 9 1.0 0 0 Band = 12 1.0 0 0 Band = 15 1.0 0 0 Band = 18 1.0 0 0 |
[spectrum] # RIGHT ANALYSER BARS Bitmap = spectrum.png Mode = scaled Position = 1414 284 Size = 162 370 HorizontalFlip = no Decay = 3 Channel = right Band = 1 1.0 0 0 Band = 3 1.0 0 0 Band = 5 1.0 0 0 Band = 7 1.0 0 0 Band = 10 1.0 0 0 Band = 13 1.0 0 0 Band = 16 1.0 0 0 Band = 19 1.0 0 0 |
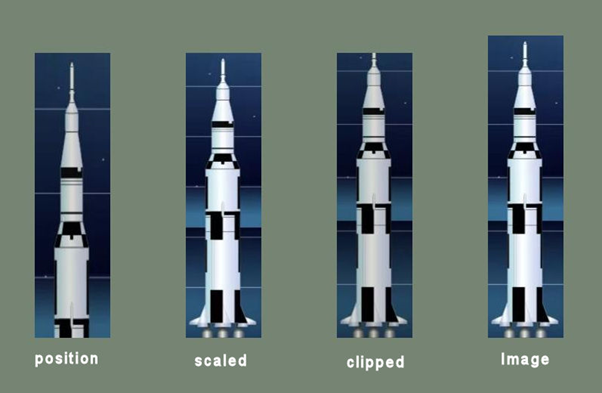
Spectrum Analyzer Mode
With the spectrum analyser you specify the bitmap graphic used for the bands and the mode specifies how the image is drawn using the audio values.
Position
Position means the graphic is drawn full size but the audio value determines its vertical position.
Position can look like a squashed picture that is being pulled up to full height
Scaled
Scaled means the graphic is drawn fully but sized to the appropriate height.
It looks a little like a concertina effect being squashed and pulled.
Clipped
Clipped means the image is not scaled to fit but is drawn at 100% scale and is revealed by the audio value
It took me a while and a fair amount of head scratching to get to grips with the basics of the spectrum analyser.
Its not always easy to envisage the effect applying either of the modes without trying them out first or having a look at other skins and see how other people have achieved particular effects.
If a picture can paint a thousand words then heres three thousand words to explain it more …….
Example 1 – Lift Off !


Example 2 – Small Block
OK so not everyone wants Saturn 5 rockets for a vu display so If you use a simple small block as the graphic then the mode effect is like this :

Example 3 – Multi-Coloured Bars
And a muli colotured graphic like this …….

Horizontal VU Bar

The bands that form the [spectrum] object are vertical components ie the object is positioned and drawn in a vertical orientation.
However, by use of the ‘angle’ parameter option we can rotate the object 0 – 359 degrees therefore we can create a horizontal VU bar by using ‘angle = 90’
When using the ‘angle’ parameter the object is rotated around a central axis point. However, please note that although the object is rotated its ‘position’ ie co-ordinates for its location (top left corner) remain the same.
As an example, In this picture below of Stans ‘Aluminium’ skin the object (vertical VU bar) is superimposed over the VU meter shown in its actual defined position co-ordinates for the left channel bar marked by the green cross. Setting the parameter to ‘angle = 90’ rotates the left VU bar around its central axis into the desired position.

Pic Courtesy of Stan
When designing the skin it may be easier to work out the physical location of where you want the graphic to be, locate its central axis and from this point work out its position co-ordinates for the .cfg file. You may have to tweak it a few times to get it spot on.
Example:
Stans .cfg for the VU Bar above
| [spectrum] # LEFT VU BAR Bitmap = vu_bar.png Mode = clipped Position = 675 228 Size = 14 340 Angle = 90 VerticalFlip = no Decay = 0 Channel = left Band = 0 1.1 0 0 | [spectrum] # RIGHT VU BAR Bitmap = vu_bar.png Mode = clipped Position = 675 258 Size = 14 340 Angle = 90 VerticalFlip = no Decay = 0 Channel = right Band = 0 1.1 0 0 |
VU Meters

(pic courtesy of Jay Thompson)
After considering the possibilities of how, if at all, it would be possible to have hi-fi style VU meters on a skin I was resoundly beaten to the post by Brian Dermody and Jay Thompson who both previewed their resulting skins on the Digital Jukebox Builders Facebook page within hours of each other.
Its actually easier to achieve than I first thought.
By using the needle of the meter as the spectrum band we simply use the ‘angle’ parameter to position the needle eg angle = -45 will lean the needle to the left to align with the scale ‘0’ and it will swing to the right in time with the music frequency/amplitude
Remember that the ‘angle’ parameter rotates around a central axis so add an equal transparent length to your needle so it pivots around its central axis point which will probably be the base of the visible needle.
Also remember that as above in the horizontal vu bar that the position co-ordinates remain the same despite use of the angle parameter.
Jay Thompsons .cfg code (background and foreground images omitted):
[bitmap]
File = needle.png
Position = 559 548
Size = 10 361
Angle = -47 [60 ${LEFT_SPECTRUM_BAND} 2]
[bitmap]
file = needle.png
Position = 868 548
Size = 10 361
Angle = -47 [60 ${RIGHT_SPECTRUM_BAND} 2]
Note – in the above example the object (vu meter needle) is defined as [bitmap] not [spectrum] and as such we are unable to modify needle movement by use of the ‘gain’ or ‘decay’ as these are parameters for [spectrum] objects not [bitmap]
Most meters are made up of three graphic objects (bitmaps). The background with the vu scale on it, the needle and a foreground or mask layer. Remember the order these appear in the .cfg file is the order they are drawn to the screen.


Colour Organ

(pic courtesy of Brian Dermody)
I’ve never come across the term ‘Color Organ’ or ‘Light Organ’ before. I assume its an American term, here in the UK we would probably describe it as a sound-to-light box. So, if your after an effect that can replicate a disco light show from back in the day look no further.
I tried unsuccessfully to get this to work a few times using layered .png files but just kept getting a blank screen. Enter Brian Dermody, at the time of writing relatively new to Fruitbox but with years of DW Jukebox experience who posted a skin with a working color organ on the Digital Jukebox Builders Facebook page and kindly shared his skin for me to check it out.
What Brian did was to use white only images with a transparent background and then use the fruitbox ‘tint’ parameter and linking its opacity to a band of the spectrum analyser so that the colour transitions from 100% transparent (000) to fully opaque (255) giving the illusion of varying illiumination brightness in time with the frequency.


The parameter for Tint is <R G B A>. By setting the RGB values to ‘0’ they are all transparent. By adding a progressive value of 255 and defining a band we will get an increase in colour proportional to the band frequency
This is typically written as:
Tint = 0 [255 ${SPECTRUM_BAND} 2] 0 0 0
Notice that the increase to 255 and the spectrum band number are placed in parenthesis between the Red ‘0’ and the Green, Blue and Alpha 0’s. This will give a Solid Red appearance
A Green spectrum band would be:
Tint = 0 0 [255 ${SPECTRUM_BAND} 2] 0 0
And a Blue would be:
Tint = 0 0 0 [255 ${SPECTRUM_BAND} 2] 0
You can mix tints to give additional colours, eg for Yellow we can mix Red and Green:
Tint = 0 [255 ${SPECTRUM_BAND} 2] 0 [255 ${SPECTRUM_BAND} 2] 0 0
If that’s a little too yellow we can add a touch of blue to tone it down:
Tint = 0 [255 ${SPECTRUM_BAND} 2] 0 [255 ${SPECTRUM_BAND} 2] 20 0
And White would be:
Tint = 0 [300 ${SPECTRUM_BAND} 8] 0 [300 ${SPECTRUM_BAND} 8] 0 [300 ${SPECTRUM_BAND} 8] 0
As a point of interest Brian reported that it is possible to ‘fool’ fruitbox to thinking it can go from 0 to 300. The highest in actuality is still 255, but the light spends more time at the high end and is fully ON when the sound level peak is 255 or above. This, in general, results in a display that is brighter than if the range is simply set from 0 to 255.
Example:
For Brians Color Organ pictured above
[bitmap] # Color Organ Green
file = ColorGreen.png
Position = 20 20
Size = 1900 1060
Tint = 0 0 [400 ${SPECTRUM_BAND} 5] 0 0
[bitmap] # Color Organ White
file = ColorWhite.png
Position = 20 20
Size = 1900 1060
Tint = 0 [400 ${SPECTRUM_BAND} 6] 0 [400 ${SPECTRUM_BAND} 6] 0 [400 ${SPECTRUM_BAND} 6] 0
[bitmap] # Color Organ Yellow
file = ColorYellow.png
Position = 20 20
Size = 1900 1060
Tint = 0 [400 ${SPECTRUM_BAND} 7] 0 [400 ${SPECTRUM_BAND} 7] 0 [30 ${SPECTRUM_BAND} 7] 0
[bitmap] # Color Organ Red
File = ColorRed.png
Position = 20 20
Size = 1900 1060
Tint = 0 [400 ${SPECTRUM_BAND} 1] 0 0 0
[bitmap] # Color Organ Blue
file = ColorBlue.png
Position = 20 20
Size = 1900 1060
Tint = 0 0 0 [400 ${SPECTRUM_BAND} 4] 0
Note: Again, as with the VU Meter example these individual layers (objects) are defined as [bitmap] not [spectrum] objects and as such we are unable to modify the effect ‘gain’or ‘decay’ as these parameters have no effect on [bitmap] objects. You can try altering the spectrum band and perhaps the maximum opacity to tweak the effect to your liking but personally I think Brians choices work well in the majority of instances and you still have the option of adding additional [spectrum] objects into the mix.
I believe screens like the above Colour Organ will gain in popularity with the release of Fruitbox v3 and its Dual Display support.
End Note
Fruitbox is truly versatile and fully customisable.
Theres more than one way to skin a cat – and more than one way to skin a Fruitbox.
This guide is just a brief introduction and I hope you find it informative and gives you some pointers. If you do design your own skin please consider sharing it with the Fruitbox community.
If you have any tips or design methods you would like to share in this guide drop me a message via Digital Jukebox Builders on Facebook.